
User Guide


63
f. Cutting, Copying and Pasting Notes. Go into Select Mode with the Select Mode Button (see
Event Editor section) and click and drag to highlight some notes. Then use the Cut, Copy and
Paste options in the Edit Menu or use Ctrl-C, Ctrl-X, and Ctrl-V. Pasting can get a little tricky,
though. The notes will paste to their identical locations in the first bar that is currently displayed
on the screen. So to paste from bar 1 to bar 2, select the notes in bar 1 and hit Ctrl-C to copy, then
scroll over to bar 2 and hit Ctrl-V. If the notes don't appear, they probably went into bar 1. Press
Ctrl-Z to undo and try again.
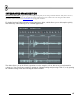
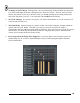
7. Chords and Harmonies. One of the really nice features of the Piano Roll is that you can have notes
sound on top of each other to create chords and harmonies. Here, we're getting into sophisticated stuff
that you need some kind of musical intuition for, but FL Studio does make life a little easier by giving
you a Chord option on the Edit Menu. Select the type of chord you want, and then go into Draw
Mode. You can now drop entire chords onto the canvas. GettingStarted7.flp is an example of a
melody with harmonies. The picture below is a snapshot from that project:
Overla
pp
in
g
Notes
8. Pitch-Bending Notes. This is really cool. If you click on the Slide Icon in the top left just under the
Edit Menu Button, you can insert pitch-bending notes (also called Slide Notes). To see how this
feature works, place a long note on the canvas, and then place a slide note above or below it. Make
sure the two notes overlap. The long note will play until it reaches the slide portion. Then the pitch
will rise towards the Slide Note and stay there until it reaches the end of the original note. The longer
the Slide Note, the longer the slide. In GettingStarted8.flp, we've added another Ins_Round Piano
Roll in pattern 4 that uses slides. Check it out.