
User Guide


55
T
T
H
H
E
E
E
E
V
V
E
E
N
N
T
T
E
E
D
D
I
I
T
T
O
O
R
R
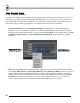
Unless you're a real pro, and you have a buffer length of zero milliseconds, you'll probably find that the live
recordings don't always sound exactly perfect. That's where the event editor comes in. Each time you
move a wheel during a recording session, the new setting is stored as an "event" for that wheel at that
moment in the loop. With the event editor, you have complete control over how the sound is tweaked
during playback.
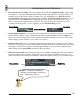
1. Record Some Live Tweaking on a Particular Wheel. The cutoff on the TS-404, for instance. Let's
assume you already did that in the previous section. If you prefer you can look at the event editor for
the INS Cutoff Wheel in GettingStarted1.flp for either the Ins_Round or Ins_Square sample.
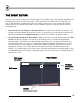
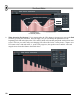
2. Stop FL Studio and Open the Event Editor. Right-click on the wheel you modified, and select Edit
Events from the pop-up menu. The screen you are looking at now is a lot like the Graph Editor
described earlier. One difference is that this graph controls the level of a single wheel or slider at a
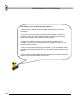
particular point in the song. (OK, it's actually more complicated than that. Remember how we told
you to keep all your live recording in a single pattern (Pattern 2) and place this pattern once at the
beginning of a song? If you do that, then the bars in the Event Editor will match the bars in the
Playlist. If you don't do that, you're on your own!) The other main difference is that this graph is used
to set Events (bright vertical lines corresponding to the value of the wheel you are setting) that persist
until the next event.
Pla
y
Indicator
Edit mode
selection
Edit menu
Vertical/
Horizontal
Zoom
(click + drag)
Events
(Each sets the level
until the next event)