
User Guide


R
R
E
E
C
C
O
O
R
R
D
D
I
I
N
N
G
G
W
W
I
I
T
T
H
H
L
L
I
I
V
V
E
E
T
T
W
W
E
E
A
A
K
K
I
I
N
N
G
G
53
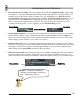
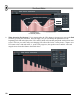
2. Record Some Live Tweaking. The easiest thing to do is load up GettingStarted5.flp - the one with
the TS404 in it. Open the Channel Settings Dialog, start the song, and practice playing with the CUT
and RES wheels of the TS404. When you think you've got something groovy, make sure you've
selected pattern 2 (the Main Automation pattern), then press the Record Switch shown below. You
may hear a three-tick countdown first, depending on whether the 321-countdown light is on (see
below). Then start the song and work your magic. The song will play once and then stop. Turn
recording off and press Play. You've just done your first Live Recording session!
Son
g
Mode Count in
Record Switch
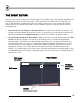
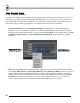
3. Set the Buffer Length low. You may have noticed that there is a short delay between your tweaking
and FL Studio's response. That's controlled by the buffer length (hit F10 and select the Audio tab).
The lower you set this slider, the faster FL Studio will respond. But don't set it too low, or the sound
will be choppy (see the "What are You Lookin' At?" section).
4. Important Note. When you've got the Recording Switch on and the loop is playing, moving a wheel
will erase over all the previously recorded tweaks from that point in the song until the end. This can be
frustrating, so often it's best to get the recording approximately the way you want it and then make
further changes in the Event Editor described in the next section.
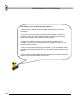
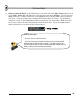
5. What can be Recorded? Most wheels and sliders are recordable, including those that control Plugins.
But some controls aren't recordable. The quickest way to tell what's recordable is to mouse over a
control and look for the red dots in the Hint Bar. If these dots appear, then you can record that control.
Descri
p
tion
Plugins. You can do live tweaking
recording on most Plugins, but not all of
them. Experiment to find out.
Red Dots