
User Guide


T
T
h
h
e
e
P
P
l
l
a
a
y
y
l
l
i
i
s
s
t
t
24
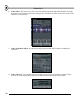
5. Using the Fill in the Song.
Yeah, big deal. But now lay out the Playlist as shown below, and hopefully you'll begin to get the
idea. Note that you need one extra dot for Pattern 1 and you need to move the Loop Point to the
second bar (Right-Click to do that.) You can find the finished product in GettingStarted3.flp.
Groovy.
6. What is in Pattern 2? By now you probably checked out pattern 2 and discovered that it seems to be
empty and still appears to be long in the playlist. All will be revealed eventually (but you could
experiment with removing the pattern from the playlist to see what difference it makes…). We’ll talk
about what pattern 2 does in the section on Live Recording. For now, just enjoy the ride!
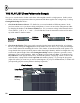
7. What is the Empty Area Below? This feature in FL Studio (Producer edition only) – is for audio
tracks and automation envelopes. Audio tracks give you the freedom to see and edit your samples right
in the Playlist. A good example of using audio tracks is the startup project itself. Open NewStuff.flp
and check the audio tracks area:
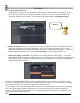
Each track can hold unlimited number of waves (unlike patterns, where each line is a specific pattern).
Each wave is actually held in an Audio Clip channel (double click a wave to see its properties). To add a
new instance of a wave, just click in an empty place inside the tracks.
Try moving the waves or cutting them with the slice tool. You can find more tutorial projects explaining
how to use them and also plenty of information in the on-line help (focus FL Studio and press F1).
See more info in the chapter Audio Tracks. You can apply automation envelopes (eg. to fade in/out an
audio clip) on top of these audio clips.