
User Guide


22
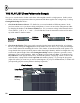
T
T
H
H
E
E
P
P
L
L
A
A
Y
Y
L
L
I
I
S
S
T
T
(
(
f
f
r
r
o
o
m
m
P
P
a
a
t
t
t
t
e
e
r
r
n
n
s
s
t
t
o
o
S
S
o
o
n
n
g
g
s
s
)
)
Now you've seen the basics of what can be done with sampled sounds in a single pattern. In this section
we'll show you how to program more than one pattern and link them together into a longer loop. Load up
GettingStarted2.flp and read on…
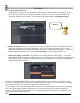
1. Check out the Pattern Selector. FL Studio lets you create hundreds of different patterns. In the
previous sections, we've just been working with pattern 1, but we can access the other patterns either
by changing the number in the Pattern Number box. Use your mouse to drag in the Pattern Selector
or use numeric ‘1’ till ‘9’ or ‘+’ and ‘-‘). You’ll find these controls somewhere on the tool bar at the
top of the main FL Studio window.
Son
g
/Pat
Button
Pla
y
Indicator
Pattern
Selector
QuickPad
(sometimes
disabled)
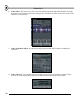
2. Check out the Playlist. This screen can be opened using the button under the hint bar, or by hitting
F5, or by right-clicking the song/pat button on the main screen (see above). Try it and you should get
a new window that looks something like below. This window is somewhat similar to the pattern view,
except that the dots operate on whole patterns rather than single channels, and the bar lengths here vary
to reflect the pattern length. Notice that GettingStarted2.flp consists of pattern 1 repeated 11 times
and pattern 2 once at the beginning. Make sure Song is selected and press Play. You should see the
Play Indicator on the playlist start to move, and hear the patterns it is playing. When it comes to the
end of the dots, it jumps back to the Loop Point and continues playing. Try moving the loop point
(right-click where you want it to go) and see what happens. (If you press the Pat button, FL Studio will
just repeatedly play the current pattern in the Step Sequencer.)
Pla
y
Indicator
Loo
p
Point
B
ar
s
Patterns
(right-click to
rename)