Media Mirror Media Mirror Plus Duplicator User’s Manual 0
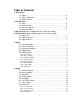
Table of Contents 1. Disc to Disc 1.1. Copy……………………………………………………………….…..3 1.2. Copy + Compare…………………………………………………......3 1.3. Source Select….…………………………………………………......3 2. Flash to Disc 2.1. Copy……………………………………………….………………......4 2.2. Multi Session……………………………...……………………….....5 2.3. Set Over Size File….……………………...………………………....6 2.4. Set Span Mode……………………………...……………………......6 3. Disc to Flash (only available with All- in-One Plus model) 4. Flash to Flash (only available with All- in-One Plus model) 4.1.
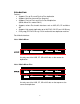
Introduction: Features: Supports Disc to Disc and Flash to Disc duplication Supports Multi-Session and Disc Spanning Supports Flash to Flash and Disc to Flash duplication (Media Mirror Plus model ONLY) Supports various Flash media interfaces such as USB, SD, CF and Micro SD Supports high speed duplication up to 24X DVD, 52X CD and 12X Blu-ray Easily copy CD/ DVD/ Blu-ray/ Flash media with one duplicator machine.
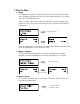
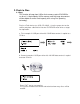
1. Disc to Disc 1.1 Copy It is important to make sure that your source disc is placed into the right drive. Normally the top drive under the flash media interface is the source drive for CD/DVD/Blu-ray disc. Select “1.Copy”, place source disc and blank discs into the proper trays, press “ENT” key, the system will detect the discs and show the following information. Press “ENT” Key. Once the copy process is finished, the copied discs will be ejected and the result of copy process will show on the LCD. 1.
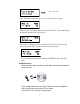
2. Flash to Disc 2.1 Copy This function will copy from USB or flash memory card to CD/DVD/Bluray disc(s). A high capacity USB or memory card with large data content can be copied to several small capacity discs using Disc Spanning technology. Plug in a Flash device (ex: USB, SD, MMS…) into the proper slot as the source and place a blank disc into one CD/DVD/BD writer drive as target for duplication. a. First example: A USB pen drive with 153MB data content is copied to a CD disc. b.
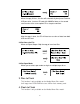
Press “ENT” Key. After detecting the needed discs, the system will start to copy. When the disc has been copied with 702 MB of data, it will automatically be ejected, and wait for the next disc. Take out the copied disc, put in another blank CD disc and close the tray, then press “ENT” key to continue the copy process. The second disc will copy the remaining 309MB of data from USB drive. 2.2 Multi Session Allows different types of memory cards with small data to be backed up to one disc.
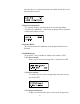
When the copy finishes, the disc will automatically be ejected. Remove USB pen drive, insert an SD card with 200MB of data as the second source and use the same copied CD as target to continue. After the copy is done, the CD will have two sessions of data from both USB and SD card. 2.3 Set Over size File Allows to Reject/Stop or Skip the copy of oversized files. Select or 2.4 Set Span Mode Allows you to select span mode to single or multiple target discs. or 3.
4.1 Copy File: Copy files stored in the source USB flash drive/memory card to the target USB flash drive/memory card. The copied files will be appended to the original target contents. Note: Original contents will not be erased from the target. 4.2 Copy Disk Data: Copy data area, including data and partition table (system information). 4.3 Copy All Disk: Copy the complete contents of a disk to another disk. 5. Utility: (If you have the Media Mirror model, this section will be under “3.Utility”) 5.
that each drive is assigned to, brand and model of each drive and drive firmware version. 5.3 System Information: This function displays the information of the controller board installed in the duplicator. Information displayed will be controller model and firmware version. 5.4 Update BIOS: This function allows the duplicator to be updated with the latest firmware. 5.5 HDD Manager: This function is only available on models with a built-in HDD. 5.5.
saved on the HDD. 5.5.4 Rename Image: This function allows you to rename each image that is saved on the HDD for better identification (up to 8 characters) 5.5.5 Delete Image: This function allows you to delete any unwanted image that is stored on the HDD. 5.5.6 HDD Information: This will display HHD info such as size of the HDD and # of files and available space. 5.5.7 Format HDD: Allows you to format the HDD. Warning: any previously stored images will be lost.
5.5.8 HDD Setup: A. Load and Copy: This function will load the image from your source disc to the HDD and automatically copy the image to your target discs afterwards Options are: OFF, Synchronous and Load First. B. Failed Image: If your image fails to load properly, you will have the option to automatically delete the image or save the image by selecting “Delete” or “Reserve” function in the sub menu. C. Default Image: Allows you to choose which image you wish to have as your default image.
Latest: This function allows the latest image loaded to the HDD to be the default. 6. Setup (If you have the Media Mirror model, this section will be under “4.Setup”) Setup allows you to adjust the duplicator to your preferences. 6.1 Set Burn Speed: Allows you to set the burn speed for your duplication needs. Note, due to the varying quality of media, a median burn speed is recommended. Selectable burn speeds: CD: 1, 2, 4, 8, 10, 12, 16, 20, 24, 32, 36, 40, 44, 48, 52, 56, MAX.
6.5 Language: Allows you to choose From English, Spanish, Japanese and Portuguese. 6.6 Time Zone setup: Allows you setup a time zone for your specific region based on GMT to time stamp your copies. Options are: GMT 0, GMT +1, … GMT +13, GMT -12, GMT -11, … GMT -1. 6.7 Clear Setup: This function will set the duplicator back to factory default. Warning: Do not use this function unless instructed by authorized technician. 6.8 Advanced Setup: 6.8.
Use “▲” or “▼” button to select the character desired, pres “ENT” key to go to the next position. 6.8.3 Set up Password: This allows you to set up a password to prevent any unauthorized changes to “5. Setup”. 6.8.4 Performance: Allows you to choose the best performance setting for your duplication needs. Options are Speed, Balance, Compatibility, and Auto.