Athena 1 to 7 targets CD/DVD Duplicator User’s Manual Version 1.0d Copyright © 2005 by ILY Enterprise, Inc. All Rights Reserved.
CONTENTS 1. INTRODUCTION 2. Features 3. Specifications 4. Hardware Installation Guide 5. Control Panel MENU OVERVIEW GUIDE 1. Copy 2. Test 3. Copy & Verify 4. Copy & compare 5. Verify 6. Compare Disc 7. Burn Speed 8. Select Source 9. Audio Track Edit 10. Utility 10.1 Pre-scan 10.2 Quick Erase 10.3 Full Erase 10.4 Eject All Disc 10.5 Disc Info 10.6 Drive Info 10.7 System Info 10.8 Update BIOS 11. Sep Up 11.1 Power On Time 11.2 Auto Start 11.3 Startup Menu 11.4 Write Method 11.5 Button Beep 11.
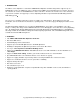
1. INTRODUCTION The Athena series duplicator is a stand-alone CD/DVD Disc Duplicator Controller that provides support for up to 7 CD/DVD discs. There are 8 IDE ports on the controller and each IDE port is independent from one another. Therefore, the controller can control several CD/DVD devices at the same time. The drives do not have to be of the same brand or speed.
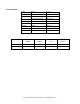
3. SPECIFICATION Power Environment Humidity Dimension Model Voltage: 5V+-5% Current: 0.7A Max Working Temperature 0C~75C Storage Temperature -20 C~85 C Working Humidity 20%~80% Storage Humidity 5%~95% Length 176 mm Height 42 mm Width 146 mm Max Burn CD Max Burn DVD Buffer Memory Total IDE Port SPEED SPEED Size Number Athena CD 56X No 16/64 MB 8 Athena DVD 56X 8X/16X 64 MB 8 Copyright © 2005 by ILY Enterprise, Inc. All Rights Reserved.
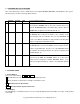
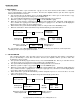
4. HARDWARE INSTALLATION GUIDE This section will show you how to set IDE devices as the Optical READER, WRITERS, and Hard Drives. The system will auto detect your drives and assign Drive numbers. READER 1 Installed WRITER HDD System Setting Information Installed No After you turn on the machine, the system will automatically detect and assign the READER drive as the Source Reader and set as Drive #1.
Copyright © 2005 by ILY Enterprise, Inc. All Rights Reserved.
MENU OVERVIEW 1 COPY Use this function to make a CD/DVD copy. Before you start use this function, please make sure you place the correct reading source and blank discs. The system will automatically detect and display how many blank discs are detected. When the system is ready, just place OK to execute CD/DVD copies. 2 TEST This is copying process simulation function. The process is the same as COPY, but it won’t write anything to the recordable disc.
10.7 System Info. This feature provides information of the duplicator, such as the Controller model number, Buffer memory capacity, and Firmware version. 10.8 Update BIOS This operation will update your duplicator’s software. You need to insert manufacturer’s certified update CD. 11 SET UP 11.1 Power On Time You can set the system warm up time from 5 sec to 255 sec after the system power is turned on. 11.
OPERATING GUIDE 1. COPY This operation will show you how to copy a Master Reading Source to a blank CD/DVD disc. Please ensure that the Master Reading Source is set as the READER if you would like to make Disc-to-Disc copies a. Turn on the duplicator before you start to copy and please make sure you have set the correct reading source and blank discs. b. The system will automatically detect and display how many blank discs were detected. c.
OPERATING GUIDE 3. COPY&VERIFY This operation will make copies and after the copy process has been finished, it will continue a Verification process automatically to ensure data’s correctness. Therefore, the duplicator will not eject discs when copy was finished until verification is finished. a. This operation will copy the Master Source onto Blank CD/DVD discs. Before you use this function to copy, make sure you have put correct reading source and blank discs. b.
The Compare Disc function serves as a bit-by-bit Comparison between Master Reading Source and all the copied discs inside the writer trays. This operation ensures that all of your copies are completely identical to your Master Reading Source. Copyright © 2005 by ILY Enterprise, Inc. All Rights Reserved.
OPERATING GUIDE 5. VERIFY This function will check your master disc and the copied discs’ readability to ensure that all of your copies are readable. a. b. c. Put master source disc and all copied discs into the duplicator, Press OK. The duplicator will then automatically start loading the disc, analyzing the source disc and start verification. When verification is finished, the duplicator writer trays will automatically eject. 5.
OPERATING GUIDE 7. SELECT SPEED This operation will allow you to adjust and select the Duplication Speed for the three different disc types: CD, Audio CD, and DVD. a. b. c. Press either button , to navigate the menu. 7. SELECT SPEED, and press OK You will see three disc types: CD, Audio CD, and DVD. Press either button , to select a disc type and press OK to confirm your selection. Press either button , to select the burning speed. 7.
OPERATING GUIDE 9. AUDIO TRACK EDIT This process will show you how to select audio tracks from various audio CDs and combine them into one customized Audio CD. 9.1 Select and Copy Track: a. Move , to 9.Audio Track Edit menu. 9.Track Edit b. Insert an Audio CD with your favorite tacks in the Reading drive and Insert ONLY ONE Blank CD-R disc into one of the writers. c. As soon as both audio CD and blank CD-R are recognized, you will see the message of “ready to press OK” on duplicator LCD screen. d.
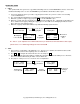
OPERATING GUIDE 10. UTILITY This function group includes several Disc related functions. You can press OK and press the up or down button to select the desired function. 10.1 Pre-scan This feature will help to check whether your Master Source Disc can be correctly duplicated. a. Select Utility and press OK 10. Utility b. Select 1. Pre-scan and press OK [Utility] 1.Prescan Press OK Prescan 76:24 20% 15:30 100% Prescan 76:24 Finished ! 10.
OPERATING GUIDE 10.7 System Info This feature provides information about the duplicator, such as the controller model number, RAM capacity, and Firmware version [Setup] 7. System Info. press OK P727DVD Ver:1.00 64MB 10.8 Update BIOS This operation will update your duplicator’s software. You need to insert manufacturer’s certified update CD. a. Turn on the duplicator and select 10. Utility, and press OK, b. Insert a correct update CD to any Drive c. Select 8. Update BIOS and press OK d.
OPERATING GUIDE 11. SET UP Use this function group to change the manufacturer’s default setting. 11.1 Power On Time You can set the system warm up time from 5 sec to 255 sec after system power on. a. Select 11. Set Up and press OK b. Select 1. Power On Time and press OK c. Press , to increase or decrease the seconds. [Setup] 1. Power On Time pressOK Power On Delay 15 seconds press , to set seconds 11.
OPERATING GUIDE 12. IMAGE MANAGER (For Duplicator with HDD Installed) This function will show you how to perform various Hard Drive related operations. If your duplicator does not have a HDD installed, the system menu will not show this function. Please refer to 12.8 ABOUT HDD MANAGER to get more information about the special function and advantages about this feature. 12.1 Select Image This function will show you how to select an Image file as a Source that you can copy to discs.
OPERATING GUIDE 12.4 Image Info This function allows you to check image file information such as the Image file number, Disc type, and its file size. [Image Manager] [Image Info.] press OK 4.Image Info. A001 DVD 4469MB [Image Info] A001 DVD 3875MB [image info] A003 CD 65:28 3.875GB DVD disc image file A001 CD disc image with 65 min 28 sec, file name A003 12.5 Delete Image This function allows you to delete a image file in HDD.
12.8 ABOUT HDD MANAGER Our duplicator uses highly intelligent and dynamic HDD management technology. The traditional method of formatting a HDD requires that you have to decide the number of partitions designated for DVDs and CDs before you format your hard drive. However, the problem is that you might not be able to accurately predict how many DVDs or CDs you will load onto your hard drive.
2. You are allowed to delete an image file by executing 12.5 delete image. Once you delete an image file, the file name will be left empty and held for a future loaded image file. The existing file name will not be changed or moved ahead due to the deletion. 3. You can check your image file information in function 12. 4 Image Info. The image information will present the image file name, Disc type and file size. [image info] A001 DVD 3875MB 3.