
Use and Care for Majestic II


9
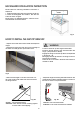
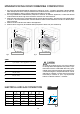
BACKGUARD INSTALLATION INSTRUCTION
HOW TO INSTALL THE ANTI-TIP BRACKET
Please follow the following installation instructions in
sequence:
1. install base feet (see proper instruction Fig.1a,1b,1c)
2. Place the backguard and fasten it with the two
screws as shown in gure.
Please refer to a qualied installer in case the enclo-
sed hardware cannot be utilized.
- Unpack the cooker and mount the feet and adjust the
height.
- Measure the height from the oor to the top edge of
the back-cross bar (picture 4) and add 15mm.
- Mark the total height on the rear wall at the cen-
tre of the cooker width. Make two holes and install
the xing bracket.
- Adjust the height of the xing brackets based on the
measurement made as explained above. Fix them to
the oor as shown in the picture below.
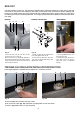
OPTION 1: wall mounted bracket
ATTENTION: check that the cooker is leaning against
the rear wall to avoid tipping.
OPTION 2: oor mounted bracket
ATTENTION: in this case 2 brackets are needed
Fig. 3
WARNING
A child or adult can tip the range and be killed
Install the anti-tip device to the structure and/or the
range ( see pictures for details)
Engage the range to the anti-tip device as explained
in picture 4a - 4b.
Re-engage the anti-tip device if the range is moved
See pictures for details
Failure to do so can result in death or serious burns to
children or adults
Fix backguard using two
screws
Fig. 4
Fig. 4a
Fig. 4b