Freestanding Cookers Operating & Installation Manual
YOUR FREE MASTERCLASS Although we encourage you to dive right in, as the owner of a brand new ILVE oven we’d also like to invite you to attend a complimentary 2 hour masterclass. As part of the class you’ll learn how to prepare and cook a number of delicious signature ILVE dishes, not to mention our top tips for getting the most out of your ILVE oven. From improving cooking results to general maintenance information, we know you’ll enjoy this comprehensive, fun masterclass. Simply go to ilve.com.
OPEN 24/7 ILVE ACCESSORIES ONLINE SHOP For a wide range of coffee machines, pods, and other ILVE accessories at the click of a button shop.ilve.com.
As a part of our continued customer service offering, you can now register your ILVE products online at warranty.ilve.com.au/registration Just follow our simple online registration process. Please ensure that you always keep your proof of purchase in order for your warranty to remain valid should you ever need to use it.
iWarranty REGISTER YOUR WARRANTY ONLINE NOW GO TO: warranty.ilve.com.
Congratulations, you are now the proud owner of an ILVE cooking appliance. Thank you for purchasing ILVE and welcome to the exciting world of cooking the ILVE way. This instruction manual has been specially created to inform you of the full range of features your ILVE appliance has to offer and serves as an introduction to the wonderful benefits of ILVE’s dynamic cooking systems. We present detailed information on each of the advanced cooking systems built into ILVE appliances.
freestanding cookers contents Safety Precautions 10 Cleaning, Care and Maintenance 32 Operating Instructions 11 Installation Instructions 36 Oven Systems 12 Electrical Connection 41 Clock and Timer Controls 13 Adaptation to Different Types of Gas 42 Electric Oven Cooking Modes 14 Injector & Capacity Table 43 Grill Systems 16 Air Adjustment 44 Using the Rotisserie 18 Low Flame Adjustment of Burners 45 Operating - Gas Cooktop 20 Low Flame Adjustment of Burners 46 Tepanyaki pla
freestanding cookers safety precautions Before installing and operating the cooking range, read these instructions completely and carefully. IMPORTANT: - To be installed only by an authorised person - Save these instructions for the local inspector’s use. - Remove all packaging material and literature from the appliance before connecting the gas and electrical supplies. Additionally note that the correct wok trivet must be placed over the wok burner.
freestanding cookers Operating instructions ILVE stoves, wall ovens and cooktops feature many advanced cooking components and safety refinements. However before using your oven for the first time the following installation check must be carefully carried out and oven elements must be burnt in. • Check that your ILVE installer has screwed the oven into its cavity and that all packaging is removed from inside oven. • Check that all oven racks are in place.
freestanding cookers oven systems Most ILVE electric ovens are multifunctional and feature 10 or 11 cooking modes (secondary ovens excempt. This enables you to choose from a variety of functions depending on your cooking needs. Selection of the correct mode and oven temperature are important to obtain the best possible cooking results. All modes are pictured on your control knob and are numbered clockwise.
freestanding cookers clocks & timer controls Key Digital clock (24 hour clock) Minute minder Automatic cooking time End of cooking time Always ensure the oven is in manual mode . The pot symbol with the steam coming from it should be displayed. If there is an [A] on the display it means that the oven is in auto mode, to cancel this you must press both pot symbol buttons simultaneously. The oven will not operate if it is pre-programmed; it has to be brought back to manual mode. 1.
freestanding cookers electric oven cooking modes ICON MODE FUNCTION MODE 1 Pizza mode ILVE’s unique Pizza mode has been specifically designed for you to cook the perfect Pizza To achieve perfect results; turn the oven thermostat up to 250 degrees (best temperature for pizza cooking) ILVE’s pizza mode will do the rest by turning on all elements in the oven at 30% and the bottom element on at 100% of their capacity.
freestanding cookers Preheating Always preheat your ILVE oven to at least 175oC before placing food in it. To do this use the Quick Start mode (Mode 9) on your control knob. Set your oven to 175oC, after the oven has reached temperature, indicated by the temperature light turning off, you may then switch the oven to your required mode. Roasting Probe ILVE’s premium models are equipped with a microprocessor controlled roasting probe which can be used to cook roasts to a precise finish.
freestanding cookers grilling systems There are two ways to grill food in an ILVE electric oven; by using radiant heat to cook the food or by using thermal grilling, a combination of radiant heat with thermal air flow. The full roof area conventional grill system uses automatically controlled direct infra-red heat radiated from above for traditional grilling applications.
freestanding cookers Shelf positions ILVE Tip • The oven door should always be closed during hot air grilling. • The temperature should be set –5 from 175 – 180º, this range in –4 temperature helps prevent food from burning and avoids splatter, –3 minimising the need for cleaning.
freestanding cookers using the rotisserie ILVE’s Rotisserie mode is represented by one of these symbols: How to use your Rotisserie • Remove all oven shelves and the wire grid from the grill tray and pre-heat the oven to 175°C. • Sit the rotisserie cradle on to the grill tray. • Slide one fork onto the rotisserie rod and secure with the wing nut. • Slide your cut of meat onto the rod being sure to pierce the centre of the cut. If cooking a whole chicken remember to truss the legs first.
freestanding cookers using the rotisserie Tips on how to use the Rotisserie 1. 1. Black plastic spit handle 2. Spit hook 3. Spit rod 4. Spit forks 2. 3. With your rotisserie kit you will get: 4. Slide meat onto the rotisserie rod and press meat onto the fork and secure in place by tightening the wing nuts.
freestanding cookers operating - gas cooktop LIGHTING BURNERS – simply press the knob in, turn anti-clockwise to maximum, the electronic igniter will spark and ignite the burner. Check that the gas has been lit; if the burner fails to ignite repeat the above process. For models with Flame Failure follow the above procedure but keep the knob fully depressed for up to 10 seconds after ignition to allow the safety to lock in.
freestanding cookers PRACTICAL HINTS FOR USE WARNING Do not use pots which exceed the width of the trivet (the trivet is the frame with fingers that the pot sits on). If pot size exceeds the edge of the trivet, flames could cause damage to work surfaces either side of the burner. Do not use pots which are too small for the burner size, they become unstable on the trivet. Always use a vessel for cooking that is appropriate in size for the size of burner. Never use pots that are too small or too large.
freestanding cookers tepanyaki plate (fry top) A = cooking tray B = drip tray C = exhaust flue for combustion fumes The Fry-Top is composed of a special stainless steel plate (8mm thick), specially designed to have temperatures evenly distributed over the whole surface so that you can utilise the complete cooking surface. The plate also has hygienic advantages. Another advantage is the high heat accumulation of the plate, with very low heat loss.
freestanding cookers Control Knob Settings C B A COOKING TABLE (purely indicative values after 10’ preheating with the burner at maximum power) KNOB POSITION TYPE OF COOKING B egg’s in 2 minutes B sliced eggplant (0.
freestanding cookers simmer plate (coup feu) Use of the Coup Feu The large “Coup feu” solid cast iron plate made of concentric rings allows you to rest the pan (or even several pans) directly on the surface (fig. B, C). it is heated by means of a gas burner (fig. A). The plate is designed to provide a moderately intense heat which is well distributed over the surface. This is ideal for slow cooking and particularly for sauces, browning and grilling, heating dishes or keeping them warm.
freestanding cookers electric bbq (lava grill) The Lava Stone BBQ allows you BBQ meats and fish with out the use of oils. The lava stones placed under the electric element enables a constant temperature (250°C) and the absorption of fats without smell and vapor. The grid, tray and lava stones are easily removable for the cleaning. Before turning on the appliance, check that all parts are well installed.
freestanding cookers ceramic electric hot plate INSTRUCTIONS FOR USE OF THE ELECTRIC PLATE The vitreous ceramic electric plate (5) is controlled by a knob (as above energy regulator). A pilot light comes on as soon as the heating element is activated. The control knob is graded from 0 to 12. Position 0 indicates that the corresponding cooking area is switched off.
freestanding cookers D – Ensure that the pan covers the whole cooking area. E – The bottom of the pan must be flat and dry so as to use less energy and keep your ceramic hob in good condition. F – Do not leave the pan handles sticking out as they could be knocked over accidentally. G – Do not forget that the cooking area remains hot for quite a long time even after it has been switched off.
freestanding cookers induction cooktop The ILVE induction cooktops have been designed to make your cooking quick and easy. When using an Induction cooktop you will need to use specific cookware, this is due to induction technology using magnetic fields which transfer the cooking energy to the base of your cookware. You need to make sure that the cookware you are using has a magnetic base.
freestanding cookers POWER BOOSTER FUNCTION The purpose of the booster function is to give more power to a determined area in order to reduce the necessary cooking time. This function is activated by turning the knob clockwise all the way to the final position. The Symbol (P) appears on the display, meaning that the booster function is activated. The booster function has a maximum duration of 10 minutes. The area concerned will then return to power setting (9).
freestanding cookers gas ovens IMPORTANT: The oven will not light unless the oven door is fully open. DO NOT TOUCH HOT SURFACES. ALLOW OVEN TO COOL BEFORE WIPING SPILLAGES. Should a spill occur, allow surface to cool and wipe up the spillage from the cover over the burner, then remove the burner cover by sliding it towards the front of the oven and lifting it out. Wipe up any excess spillage that may have migrated into the base of the oven.
freestanding cookers TYPE OF FOOD GRILL OVEN Meat Roasts ROTISSHELF SERIE • • 2-3 Small Cuts • 4 Steak/Sausages • 3-4 Whole Fish Fillets • • Poultry Whole Pieces • • 3 • 3 Combined Meats • 3-4 Pastry Dishes – Pies, etc. • 2 Egg Dishes – Quiche, Souffle, Pavlova, etc. • 2-3 Bread Pizzas • 2 AuGratin/Crumb Cheese • 3-4 Toasted Sandwiches • 3-4 Rotisserie This is done on the static grill function. The rotisserie can weight bear up to 8kg.
freestanding cookers cleaning, care & maintenance Always wipe spills up when they occur. Do not leave spills to dry onto the surface of the hob. IMPORTANT – DO NOT PLACE ANYTHING ON OR COVER THE BASE OF THE OVEN AS THIS IMPEADS THE TRANSFER OF HEAT FROM THE BOTTOM ELEMENT TO THE OVEN CAVITY AND CAN CAUSE IRREPARABLE DAMAGE TO THE OVEN ENAMEL LINING.
freestanding cookers You may also need to wipe the door and inner glass if required. Leave the oven with the door closed and in this time the fat absorbed in the catalytic liners will burn off the liners and the elements. All ILVE ovens use easy clean vitreous enamel interiors giving a smooth black non staining appearance. Once the oven is cool you may need to wipe the base of the oven with a damp sponge to remove the product of the burn off.
freestanding cookers cleaning, care & maintenance Cooktops Clean the stainless steel cooktop surface after each use with a clean cloth and normal detergent. Make sure the detergent does not contain chloride or any chloride compound. For persistent stains use warm vinegar or a non-abrasive cleaner. To make cleaning easier always wipe spills when they occur, do not leave them to dry as this makes cleaning harder. Trivets Trivets should only be cleaned once they have cooled, to stop crazing from occurring.
freestanding cookers NOTE: The light may be difficult to remove over time. Try using Multi-Grips being sure NOT to break the bulb and/or glass. Rangehoods Rangehood filters need to be washed regularly by using warm soapy water and dried using a soft dry cloth. There are various commercial products available which also may be used. Follow manufacturers’ directions for use. Cleaning filters in the dishwasher: The heavy alkalinity of dishwashing detergents could damage filters.
freestanding cookers installation instructions GENERAL 1. The requirements of local Gas and Electrical authorities must be adhered to, Consult ASNZS 5601 and SAA Wiring Rules as appropriate 2. Location of gas connection (See table) 3. Electrical connection (See Table) 4. Overall dimensions of hotplate Refer to dimensions chart in following pages 5. Eurolinx Pty Ltd and their appointed agents decline any responsibilities in the case of installation not A according to these instructions.
freestanding cookers installation instructions B M-70/MT-70/MC-70 520 200 M-90/MT-90/MC-90 750 200 MD-100/MTD-100/MC-100 460 230 M-120/MT-120/MC-120 700 290 MD-120/MDT-120/MDC-120 675 230 M-150/MT-150/MC-150 730 220 M70-MT70-MC70 M90-MT90-MC90 M120-MT120-MC120 Rear View M100-MTD100-MCD100 700 0 60 B G M150-MT150-MC150 MD120-MTD120-MCD120 15 A E 90 A 230 Model/mm Side View-Majestic Techno √ 150 100 √ 160 770 70 √ 30 √ 920 30 Side View-Majestic Side View-Majestic Cou
freestanding cookers clearances Rangehoods and overhead exhaust fans must be installed according to the manufacturers’ instructions and local regulations but in no case shall clearance from hob burners be less than 600mm for the rangehood and 750mm for the overhead exhaust fan. At all times gas safety regulations and local building codes must be adhered to.
freestanding cookers installation instructions 900 600 100 √ 160 100 √ 160 750 750 60 40 15 35 45 Example: P90WMP ILVE Freestanding Operating Manual 39
freestanding cookers installation instructions INSTALLATION These technical instructions have been prepared for use by Authorised persons. This unit must only be installed by an Authorized person. The installation must be carried out by qualified personnel in accordance with the relevant requirements of the Gas Safety Regulations, the local Building Regulations.
freestanding cookers electrical connection BEFORE CONNECTING THE PLUG INTO THE POWER SOCKET, FOLLOW THESE INSTRUCTIONS The electrical supply for the upright cooker must be a 230 - 240 volt 50 Hz. The fuse and electrical wiring of the home / premises must support the load of the appliance. The wiring used to connect the electricity must be of a suitable size to carry the current load as specified on the product compliance plate.
freestanding cookers adaptation to different types of gas The range is supplied as a natural gas unit and should not require any adjustment of the aeration. If the appliance is ordered and specified as a ULPG gas then it will be converted by Eurolinx prior to dispatch and should not require any adjustment to the aeration. Follow the steps below to convert to ULPG gas and to adjust the aeration of the burners. Remove the pan supports, caps and burners from the hob.
freestanding cookers injector & capacity table BURNER NATURAL GAS Inj DUAL WOK SINGLE WOK ULPG Mj/h Kpa 1.60/0.68 14/2.2 1.00 Inj Mj/h Kpa 0.92/.040 13.1/2 2.75 1.70 13.8 1.00 0.92 11.00 2.75 SINGLE WOK 1.60 12.5 1.00 0.92 11.00 2.75 LARGE 1.40 10.0 1.00 0.82 9.00 2.75 SIMMER PLATE 1.40 10.0 1.00 0.82 9.00 2.75 MEDIUM 1.10 6.2 1.00 0.68 6.00 2.75 FISH / TEPANYAKI 1.60 12.5 1.00 0.85 10.00 2.75 OVEN 60cm 1.30 8.5 1.00 0.75 6.80 2.
freestanding cookers air adjustment The air adjustment is to be carried out with the flame at the maximum, with a screwdriver loosen screw “F” and move the cylindrical sleeve “R” towards the injector to decrease the air, move it away from the injector to increase the air. Once the correct aeration is achieved tighten screw “F” to fix the position. Examples: A. Flame with excess of air: it is small, tight and separated. Move forward the cylindrical sleeve R placed in front of the injector. B.
freestanding cookers low flame adjustment of burners When installing the appliance it is recommended to check that the burner minimum speed (Low Flame Setting) has been correctly adjusted. If it is necessary to change the type of gas, adjustment of the low flame setting must be completed by the installer.
freestanding cookers low flame adjustment of burners Check that the igniter for each burner successfully ignites the gas and that the burner remains alight. If an igniter fails to work or a burner fails to remain alight, first remove the plug from the electrical power outlet, and then check that all electrical connections are in place. If the hotplate fails to operate correctly, contact ILVE or their appointed agent for service (1300 MY ILVE 694 583).
freestanding cookers ancillary service information Pressure Adjustment First turn the gas off to the appliance. Remove the sealing screw from the regulator’s test point at the rear of the appliance and place the hose of the Manometer onto it. Turn the gas on to the appliance and light the Wok Burner and Small Burner at maximum setting. Check the pressure and adjust at the regulator if necessary to the setting in the table on the last page or the Data plate.
Ilve Recipes Teppanyaki Australian Breakfast Marinated Seafood Skewers Gourmet Pizza Tasmanian Scallops Creole Style Mustard Crusted Roast Leg of Lamb Steamed Trout with Dill & Lemon Grilled Lamb Cutlets & Vegetables Rack of Lamb with Cheese & Semi-dried Tomato Hazelnut Torte with Chocolate Ganache PannaCotta with berries More recipes are available on the ILVE operating Instructions DVD available for purchase at shop.ilve.com.
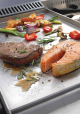
Serves 2 Preparation time: 10 minutes Cooking time: 10 minutes Ingredients: 2 piece of trimmed steak (the cut of meat is up to you) 2 pieces of salmon steaks (or any other fish steak) ½ a capsicum 4 mushrooms ½ a bunch of rosemary leaves ½ an onion chopped 1 bunch of shallot tails 1 garlic clove Extra virgin olive oil Salt and pepper ➊ Cut and trim vegetables place in deep bowl and mix in rosemary leaves garlic and extra virgin olive oil and mix well.
Serves 2 AUSTRALIAN BREAKFAST Preparation time 10 minutes Cooking time 10 minutes Ingredients: 4 eggs 4 sausages 6 rashes or bacon 2 large mushrooms sliced 2 tomatoes halved ➊ Heat teppanyaki plate up for 10 minutes then spray plate with extra virgin olive oil. ➋ Place sausages on teppanyaki plate and cook for 5 minutes turning as needed. ➌ Add bacon, mushroom, tomatoes and cook for a further 5 minutes.
Serves 4 Preparation time 20 minutes Cooking time 5 minutes Ingredients: 1kg seafood, salmon, green prawns and octopus ½ cup (125ml) olive oil Juice 1 lemon 2 cloves garlic, crushed 1 tablespoon parsley or dill, chopped Freshly ground pepper, to taste Bamboo skewers, soaked in water ➊ Cut salmon into cubes, peel prawns and cut tentacles off octopus, leaving on tails. ➋ Mix together oil, lemon, parsley or dill and pepper to taste in a bowl, making marinade.
Serves 3-4 GOURMET PIZZA Preparation time 1 hour Cooking time 15 minutes Ingredients: Pizza Dough 3 cups plain flour or bakers flour Salt 30g dried yeast 1 cup (250ml) warm water 3 tablespoons olive oil Toppings A selection of your favourite pizza toppings Tomato sauce Mozzarella cheese ➊ Sift flour and salt into a large mixing bowl and sprinkle dried yeast over flour. Make a well in the centre of the flour, salt and yeast mix then pour in water and oil. Stir in flour, combining to make soft dough.
Serves 4-6 Preparation time 10 minutes Cooking time 5-8 minutes Ingredients: 12 fresh scallops in half shell 1 lime or lemon Crumb Mixture 100g butter, softened 1 cup dry fresh breadcrumbs 2 teaspoons cajun spice 1 teaspoon tomato paste 2 egg yolks 2 teaspoons sweet chilli sauce Dash brandy, optional ➊ Preheat grill to high (Mode 6). ➋ Place scallops in shell on baking tray. ➌ Combine all crumb mixture ingredients to make a smooth paste.
Serves 6-8 MUSTARD CRUSTED ROAST LEG OF LAMB Preparation time 10 minutes Cooking time 90 minutes Ingredients: 1½ - 2kg leg of lamb 1 large clove of garlic, slivered 3 tablespoons seeded mustard 1 teaspoon sweet soy sauce ➊ Preheat oven (Mode 9) to 160° C. Once this temperature is reached turn oven to (Mode 7). ➋ Pierce lamb with a knife to make slits. Place garlic slivers into slits. ➌ Mix together seeded mustard and soy sauce, making a paste and spread paste evenly over the leg of lamb.
Serves 6-8 Preparation time 10 minutes Cooking time 15 minutes Ingredients: 1 500g trout, cleaned and scaled 6-8 cups (1.75-2L) fish stock or water Sprigs of dill 1 lemon, sliced 1 spanish onion, sliced ➊ Place trout, dill, lemon slices and spanish onion slices onto a perforated tray into fish kettle. ➋ Carefully pour in 1-2 cups of water or stock in fish kettle and lower tray with trout carefully into fish kettle, cover with lid.
Serves 2 GRILLED LAMB CUTLETS & VEGETABLES Preparation time 10 minutes Cooking time 5-8 minutes Ingredients: 6 extra thick french trimmed lamb cutlets Selection of your favourite vegetables, for example capsicum, spanish onion and zucchini Extra virgin olive oil Salt and pepper ➊ Season cutlets with salt and pepper. ➋ Slice vegetables, toss in oil and season with salt and pepper. ➌ Heat grill plate or teppanyaki to hot.
Serves 2 Preparation time 15 minutes Cooking time 35 minutes Ingredients: 1 rack lamb, french trim 6 sundried tomatoes 50g tasty cheese, small pieces Sprigs of rosemary 4 thin slices pancetta ham 1½ (375ml) cups rich red wine sauce or gravy ➊ Preheat oven (Mode 9) to 250ºC. Once this temperature is reached turn oven to (Mode 2). ➋ With knife or skewer make an incision along the lamb fillet just below the bone. ➌ Make the incision wider by stretching cavity with your fingers.
Serves 6-8 HAZELNUT TORTE WITH CHOCOLATE GANACHE Preparation time 20 minutes Cooking time 35-45 minutes Ingredients: 6 eggs ¾ cup caster sugar 1 cup ground hazelnuts ¾ cup white breadcrumbs 1 teaspoon plain flour Chocolate Ganache 300g dark cooking chocolate ½ cup (125ml) fresh cream Hazelnuts to decorate ➊ Preheat oven (Mode 9) to 150ºC. Once this temperature is reached turn oven to (Mode 7). ➋ Separate eggs, placing whites in bowl to side. Beat egg yolks until thick and pale.
Serves 4 Preparation time 10 minutes Cooking time 5 minutes Ingredients: 1 ¾ cups double cream 4 tablespoons caster sugar Vanilla 2 teaspoons gelatine Fresh berries or your favourite fruit for serving ➊ Put cream and sugar in a saucepan, stirring until sugar dissolves. Bring to the boil, then turn down and simmer for 3 minutes. ➋ Add a few drops of vanilla. ➌ Put a small amount of the cream mixture into a bowl, add gelatine into mixture to dissolve and then pour in remaining cream mixture.
freestanding cookers GUARANTEE The Manufacturer declines any liability in case of direct or indirect damages caused by an incorrect installation, changes, poor servicing or incorrect use.
freestanding cookers NOTES ILVE Freestanding Operating Manual 61
freestanding cookers WARRANTY CARD Eurolinx Pty Limited A.B.N. 50 001 473 347 trading as ILVE (“ILVE”) Office: 48-50 Moore Street, Leichhardt N.S.W 2040 Post: Locked Bag 3000, Annandale, N.S.W 2038 P: 1300 856 411 WARRANTY REGISTRATION Your ongoing satisfaction with your ILVE product is important to us.
ILVE.COM.AU 5. Proof of Purchase Customers must retain proof of purchase in order to be eligible to make a warranty claim in respect of an ILVE product. 6. Claiming under the Warranty Customers will bear the cost of claiming under this Warranty unless ILVE determines the expenses are reasonable, in which case the customer must claim those expenses by providing written evidence of each expense to ILVE at the address on the Warranty Registration Card. 7.
freestanding cookers TROUBLESHOOTING PROBLEM ANSWER CooktopS My burners will not ignite • Check to see if the brass burners are placed correctly into the aluminium base. This is very important as it will ensure the flame holes line up with the ignition post and spark. It will also ensure correct combustion when alight. • Does your ILVE cooktop have flame failure devices fitted? Ensure burners are located correctly as above. When burner is lit, ensure knob is firmly depressed for 5 to 10 seconds.
freestanding cookers TROUBLESHOOTING PROBLEM ANSWER OVENS How do I change the door seals? Please note: the replacement of oven door seals does not require a service technician. Door seals are easily replaced, please contact your ILVE state office, who will arrange for a replacement to be sent. If out of warranty please contact the ILVE spare parts department on 02 8569 4666 or spareparts@eurolinx.com.
Australia National Telephone Number 1300 MYILVE (694 583) New Zealand Telephone Number 0508 458 369 ILVE showrooms are open daily from 9am-5pm and Saturdays 10am-4pm (WA by appointment only on Saturdays) NSW & ACT (Head Office) 48-50 Moore Street Leichhardt F 02 8569 4699 VIC, TAS & SA 1211 Toorak Road Camberwell F 03 9809 2155 QLD 1/42 Cavendish Road Coorparoo F 07 3397 0850 ilve.com.au WA & NT Unit 10/55 Howe Street Osborne Park F 08 9201 9188 New Zealand PO Box 11.