
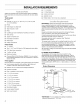
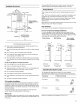
Installation guide
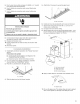

When
fitting
the
cover,
check
that
the
side
rails
fit
in
the
proper
head-screws
(those
used
to
fix
the
lower
vent
cover
to
the
hood)
on
the
right
and
left
side
of
the
duct.
A.
Lower
vent
cover
screws
B.
Glass
visor
C.
Aesthetic
cover
instal
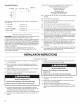
Filters
For
non-vented
(recirculating)
installations
1.
Turn
off
blower
and
lights.
Check
that
halogen
lamps
are
cool.
2.
Remove
the
metal
grease
filters
by
pushing
handle
toward
the
rear
and
pull
downward.
3.
Pull
filter
toward
front.
>
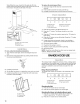
5.
Install
charcoal
filter
on
rear
of
metal
filter
with
metal
wires
provided
in
filter
packaging.
A.
Metal
wires
B.
Charcoal
filter
C.
Metal
filter
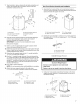
10
Set
the
filter
face
down
on
a
protective
cover
such
as
a
towel.
To
replace
the
metal
grease
filters:
1.
Insert
back
edge
of
filter
into
rear
channel
of
the
filter
opening.
2.
Push
handle
toward
the
rear
and
push
filter
up.
3.
Pull
filter
toward
the front
and
insert
into
front
channel.
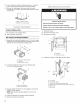
Check
Operation
SS
O06
A
B
C
D
«E
A.
Indicator
light
B.
Light
button
C.
Low
speed
button
D.
Medium
speed
button
E.
High
speed
button
1.
Press
the
“B”
button.
The
light
should
turn
on.
2.
Press
the
“C”
button.
The
blower should
turn
on
at
low
speed.
3.
Press
the
“D”
button
for
medium
speed
or
the
“E”
button
for
high
speed.
4.
Press
the
“B”
button
to
turn
off
the
light.
Press
the
“C”
button
to
turn
off
blower
5.
If
range
hood
does
not
operate,
check
to
see
whether
a
circuit
breaker
has
tripped
or
a
household
fuse
has
blown.
Disconnect
power
supply.
Check
that
the
wiring
is
correct.
Replace
all
parts
and
panels
before
operating.
Reconnect
power.
NOTE:
To
get the
most
efficient
use
from
your
new
range
hood,
read
the
“Range
Hood
Use”
section.
pe
On
RANGE
HOOD
USE
Operation
The
canopy
hood
is
designed
to
remove
smoke,
cooking
vapors
and
odors
from
the
cooktop
area.
For
best
results,
start
the
hood
before
cooking
and
allow
it
to
operate
several
minutes
after
the
cooking
is
complete
to
clear
ail
smoke
and
odors
from
the
kitchen.
Range
Hood
Control
Panel
The
range
hood
controls
are
located
on
the
underside
of
the
canopy.
©
@ ©
A
B
C
D
«&
A.
Indicator
light
B.
Light
button
C.
Low
speed
button
D.
Medium
speed
button
E.
High
speed
button
Operating
the
light
1.
Press
the
“B”
button
to
turn
on
the
light.
2.
Press
the
“B”
button
again
to
turn
off
the
light.
Operating
the
blower
and
adjusting
blower
speed
1.
Press
the
“C”
button
for
low
speed,
the
“D”
button
for
medium
speed
or
the
“E”
button
for
high
speed.
2.
Press
the
“C”
button
to
turn
off
the
blower.