
User Manual


8
D) Replacement of a cylinder
Make sure that:
• all taps on the gas consuming appliance are in
the“o”position.
• the“CompactQuick-on”regulatorhandle(2)isin
the“o”position.Then,dismountthe“Compact
Quick-on” by pressing horizontally on the handle
(2)andpullingupwardsatthesametime.(Fig4).
Do not move the cylinder during operation.
System maintenance
• In extended periods of non-use the regulator
should be disconnected from the cylinder.
Regulator should be protected from debris and
dust during storage.
• In normal conditions of use, to ensure correct
system operation, it is best to replace the
pressure regulator within 10 years from the date
of startup. The pressure regulator must conform
to EN16129 standard.
• When replacing the pressure regulator or the
hose, it may be necessary to replace the clamps.
In this case, use clamps dimensions 15/17.
• After performing any maintenance operations,
always check for leaks before starting again.
• Thepressureregulatordoesnotrequireany
special maintenance jobs, but always make sure
thevent(3)isnotblocked.Ifitisblocked,itcan
be freed by means of a needle.
User instructions
Before proceeding, make certain that you
understand the WARNING statements in this
manual.
• Preparation before cooking – To prevent foods
from sticking to the cooking grill, please use a
long handled brush to apply a light coat of
cooking or vegetable oil before each barbecuing
session.
• Note: When cooking with your barbecue for the
rsttime,thepaintontheoutsideofthe
barbecue may change colour slightly as a result
of high temperatures. This is normal and should
be expected.
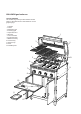
Lighting the barbecue
• Openthebarbecuehood(2).
• Ensureallknobsareinthe‘OFF’position(7).
OFF
LOHIOFF
• Unscrewignitionbutton(8)andinsertAA
battery, positive end facing outwards. Screw
ignitionbutton(8)backintoplace.Openthe
barbecuehood(2)andturnongassupplyatgas
cylinder.
• Turnburnercontrolknob(7)toposition
.
HI
• Pressandholdignitionbutton(8)toignitethe
burnerames.Ifignitiondoesnotoccurin5
seconds,turnburnercontrolknob(7)toOFF ,
wait 5 minutes, and repeat the lighting
procedure.
• In windy conditions, shield from wind to ensure
easy lighting.
• Onceignitionhasoccurred,turncontrolknob(7)
tolowerorraiseheatasrequired.
• After ignition, the burners should be burned at
the high position for 3-5 minutes in order to
preheat the barbecue. This process should be
done before every cooking session.
IMPORTANT - The hood should be open during
preheating.
• After completion of preheating, turn burners to
low position and cook with the hood in the down
position for best cooking results.
LO
Manual lighting instructions
• Removethecookinggrill(4),griddleplate(13)
andvapourbar(5)frombarbecue.
• Placealitmatchbesidetheburner(6)(atthe
samelocationasthesparkershield).
• Pushandturntherightmostcontrolknob(7)
anti-clockwise to the high position.
• After successful lighting, light each burner from
left to right as desired.
Grill Cooking
Thevapourbarevenlydistributestheburnerame
across the cooking grill area. The natural food
juices produced during cooking fall onto the hot
vapour bar below and vaporise.
Even cooking of food will be achieved by using the
barbecue with the hood down. This should only be
done with the burner on low.
Flare-Up Control
IMPORTANT – FLARE UPS CAN OCCUR FROM
RESIDUE FAT AND JUICES DRIPPING ONTO THE
BURNERS AND HOT VAPOUR BAR. To reduce this,
regularly clean the burners and vapour bar. To
controlare-up,itisadvisabletotrimawayexcess