
Installation Instructions


www.desatech.com
108319-01D
4
a.
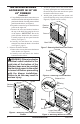
Using a Phillips screwdriver, remove the screw
and retainer bracket at the top of the brick liner
panel on the left side. Carefully remove the left
panel from the rebox (see Figure 6).
b. Repeat the removal steps for the brick liner
panel on the right side.
c. Remove the screw and retainer bracket at
the top of the brick liner panel at the rear
of the rebox. IMPORTANT: Do not let
panel fall after bracket has bee removed.
Carefully remove the rear panel from the
rebox (see Figure 7).
d. Carefully lift and remove the concrete
rebrick oor from the rebox if installed
(see Figure 5, page 3).
2. Remove the rebox bottom.
a. Remove the 4 screws that secure the bottom
of the rebox (see Figure 8).
b. Carefully raise and remove the firebox
bottom from the rebox.
WARNING: If there is a duplex
electrical outlet installed in the
right side of the bottom of the
replace base area, be sure that
the electrical power to the outlet
is turned off before proceeding
with the blower installation.
Failure to do this may result in
serious injury.
Figure 6 - Removing Left Panel from
Firebox
Left Panel
Retainer
Bracket
Screw
Back Panel
Retainer
Bracket
Screw
Figure 8 - Removing Firebox Bottom
Figure 7 - Removing Back Panel from Firebox
Screws
INSTALLING BLOWER
ACCESSORY IN 36" OR
42" FIREBOX
Continued
Figure 9 - Mounting Blower to Firebox
3. Attach the power cord to the blower motor
by rmly pushing the two female terminals at
the end of the power cord onto the two spade
terminals on the blower motor.
4. Attach green ground wire from power cord
to blower housing using screw provided (see
Figure 9). Tighten screws securely.
Screws
Blower
Lower Rear Wall
of Firebox Wrapper
Top
Mounting
Tab
Exhaust Port
Screw