
User manual

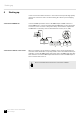


Table Of Contents
- Table of contents
- 1 General information
- 2 Safety instructions
- 3 Features
- 4 Installation
- 5 Starting up
- 6 Connections and controls
- 7 Operating
- 7.1 Starting the device
- 7.2 Main menu
- 7.3 Menu overview
- 7.4 Functions in 2-channel DMX mode
- 7.5 Functions in 3-channel DMX mode 1
- 7.6 Functions in 3-channel DMX mode 2
- 7.7 Functions in 4-channel DMX mode
- 7.8 Functions in 6-channel DMX mode
- 7.9 Functions in 13-channel DMX mode
- 7.10 Functions in 16-channel DMX mode
- 7.11 Functions in 29-channel DMX mode
- 8 Technical specifications
- 9 Plug and connection assignments
- 10 Troubleshooting
- 11 Cleaning
- 12 Protecting the environment

NOTICE!
Possible damage due to moisture
Moisture entering into open connectors (plugs and couplers) of DMX or
power cords can cause short circuits.
Close unused connectors with end caps intended for this purpose
(www.thomann.de).
The quick lock openings on the housing bottom are used for secure attachment of
the supplied Omega brackets. Here you can attach the ight adapters (such as the
supplied C-hooks). The safety rope must pass through the notches on the bottom
case as shown in the following gure.
You can install the unit in hanging or standing position. When in use, the device must
always be attached to a solid surface or an approved truss.
Always work from a stable platform whenever installing, moving or servicing the
unit. In doing so, the area underneath the unit must be cordoned o.
ö
ö
#
1 Quick lock openings for Omega brackets
2 Openings for safety cable
Mounting options
Installation
Co9 V2 LED Flood IP65 540W RGBW
11
LED Floodlight