
User manual
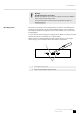
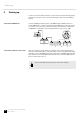

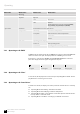
Table Of Contents
- Table of contents
- 1 General information
- 2 Safety instructions
- 3 Features
- 4 Installation
- 5 Starting up
- 6 Connections and controls
- 7 Operating
- 7.1 Starting the device
- 7.2 Main menu
- 7.3 Menu overview
- 7.4 Functions in 2-channel DMX mode
- 7.5 Functions in 3-channel DMX mode 1
- 7.6 Functions in 3-channel DMX mode 2
- 7.7 Functions in 4-channel DMX mode
- 7.8 Functions in 6-channel DMX mode
- 7.9 Functions in 12-channel DMX mode
- 7.10 Functions in 14-channel DMX mode
- 7.11 Functions in 26-channel DMX mode
- 8 Technical specifications
- 9 Plug and connection assignments
- 10 Troubleshooting
- 11 Cleaning
- 12 Protecting the environment

5 Starting up
Create all connections while the device is o. Use the shortest possible high-quality
cables for all connections. Take care when running the cables to prevent tripping
hazards.
Connect the DMX input of the device to the DMX output of a DMX controller or
another DMX device. Connect the output of the rst DMX device to the input of the
second one, and so on to form a daisy chain. Always ensure that the output of the
last DMX device in the daisy chain is terminated with a resistor (110 Ω, ¼ W).
When you congure a group of devices in ‘Master / Slave’ mode, the rst unit will
control the others. This feature is especially useful to start a show without much pro‐
gramming. Connect the DMX output of the master unit to the DMX input of the rst
slave unit. Then connect the DMX output of the rst slave unit to the DMX input of
the second slave unit and so on.
Please note that this device must not be connected to a dimmer.
Connections in DMX mode
Connections in ‘Master / Slave‘ mode
Starting up
12
Co6 V2 LED Flood IP65 270W RGBW
LED Floodlight