
Instruction Manual

u IBX-210-CV-N2600 Embedded System
Page 16
3.7.1 Wall Mount
To mount the embedded system onto a wall using the optional VESA 75 wall mount kit,
please follow the steps below.
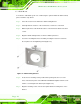
Step 1: Select the location on the wall for the wall-mounting bracket.
Step 2: Carefully mark the locations of the four brackets screw holes on the wall.
Step 3: Drill four pilot holes at the marked locations on the wall for the bracket retention
screws.
Step 4: Align the wall-mounting bracket screw holes with the pilot holes.
Step 5: Secure the mounting-bracket to the wall by inserting the retention screws into
the four pilot holes and tightening them (Figure 3-5).
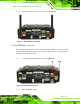
Figure 3-5: Wall-mounting Bracket
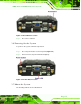
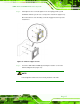
Step 6: Insert the four mounting screws provided in the package into the four screw
holes on the bottom panel of the uIBX-210-CV-N2600 and tighten until the screw
shank is secured against the bottom panel (Figure 3-6).
Step 7: Align the mounting screws on the bottom panel with the mounting holes on the
bracket.