
User guide


PPC-37xxA-N26 Panel PC
Page 32
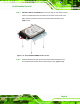
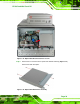
Figure 3-17: Replacing the PPC-3710A-N26 HDD Bracket
3.8.3 PPC-3712A-N26 HDD Installation
To install the HDD into the PPC-3712A-N26, please follow the steps below:
Step 1: Remove the back cover. See Section
3.5.
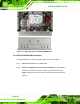
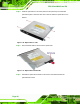
Step 2: Remove the optical drive bracket. Undo the optical drive bracket screws and
remove the optical drive bracket. See
Figure 3-18.
Step 3: Follow Steps 2 ~ 4 in Section
3.8.2 to install a hard disk drive to the panel PC.
Step 4: Replace the optical drive bracket.
3.9 Optical Disk Drive Installation (PPC-3712A-N26 Only)
To install an optical disk drive, please follow the steps below.
Step 1: Remove the back cover. See Section
3.5.
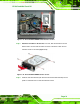
Step 2: Remove the optical drive bracket from the PPC-3712A-N26. To do this,
remove four retention screws, two on the side panel and two inside the panel PC
(
Figure 3-18).