
Owner's manual

PAC-1000G QIG IEI Technology Corp. Page 9
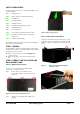
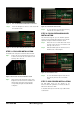
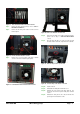
Figure 23: Three Internal Fan Bracket Retention Screws
Step 5: Remove the drive bracket. (Please refer to S
TEP 8.1:
D
RIVE BRACKET REMOVAL)
Step 6: Remove the five front panel retention screws to remove
the front panel.
Figure 24: Five Front Panel Retention Screws
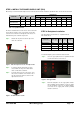
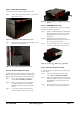
Step 7: Remove the four front panel metal plate retention
screws to remove the metal front panel plate.
Figure 25: Four Metal Front Panel Plate Retention Screws
Figure 26: Remove the Metal Front Panel Plate
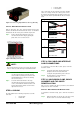
Step 8: Remove the fan filter cover and the fan filter pad inside.
(Please refer to Step 1 of F
AN FILTER REPLACEMENT
section)
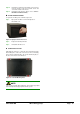
Step 9: Press the three fan clips, one on the top of the fan and
two at the bottom of the fan, and push the fan outwards.
Figure 27: One Fan Clip on the Top of the Fan
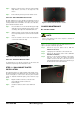
Figure 28: Two Fan Clips at the bottom of the Fan
Step 10: Install a new fan.
Step 11: Reinstall the fan filter pad and fan filter cover.
Step 12: Reinstall the front panel metal plate with the four
previously removed front panel metal plate retention
screws.
Step 13: Reinstall the front panel to the chassis with the five
previously removed retention screws.