
Manual
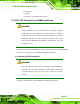

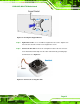

Table Of Contents
- 1 Introduction
- 2 Detailed Specifications
- 3 Unpacking
- 4 Connector Pinouts
- 4.1 Peripheral Interface Connectors
- 4.2 Internal Peripheral Connectors
- 4.2.1 Fan Connectors
- 4.2.2 Front Panel Connector
- 4.2.3 Digital Input/Output Connector
- 4.2.4 IDE Connector
- 4.2.5 LCD Backlight Connector
- 4.2.6 LVDS LCD connector
- 4.2.7 Power Connector
- 4.2.8 14-Pin Serial Port Connectors
- 4.2.9 10-Pin Serial Port Connectors
- 4.2.10 SATA Drive Connectors
- 4.2.11 SPDIF Connector
- 4.2.12 Internal USB Connectors
- 4.3 External Interface Connectors
- 5 Installation
- 6 AMI BIOS
- 7 Driver Installation
- A BIOS Options
- B DIO Interface
- C Watchdog Timer

KINO-9453 Mini-ITX Motherboard
Page 62
5.3.3 DIMM Installation
WARNING:
Only DDR2 memory module can be installed on the KINO-9453. Do not
install DDR memory modules. If a DDR memory module is installed on
the KINO-9453, the KINO-9453 may be irreparably damaged. Please
make sure the purchased DIMM complies with the memory
specifications of the KINO-9453. DIMM specifications compliant with
the KINO-9453 are listed in Chapter 2.
To install a DIMM into a DIMM socket, please follow the steps below and refer to
Figure 5-6.
Figure 5-6: Installing a DIMM
Step 1: Open the DIMM socket handles. The DIMM socket has two handles that
secure the DIMM into the socket. Before the DIMM can be inserted into the
socket, the handles must be opened. See
Figure 5-6.