
User guide

IOVU-572M Panel PC
Page 31
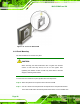
Step 17: Align the retention screw holes on the mounting arm interface with those on the
IOVU-572M.
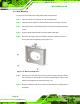
Step 18: Secure the IOVU-572M to the interface pad by inserting four retention screws
through the bottom of the mounting arm interface pad and into the IOVU-572M.
Step 0:
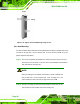
4.4.4 Stand Mounting
The IOVU-572M has Video Electronics Standards Association (VESA) standard mounting
holes tapped into the rear panel. The monitor stand mounting plate has a matching VESA
hole pattern. To mount the IOVU onto a stand, please follow the steps below.
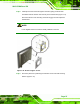
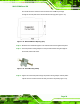
Step 1: Line up the threaded holes on the monitor rear panel with the screw holes on the
monitor stand mounting plate.
Step 2: Secure the monitor to the stand with the supplied retention screws
(
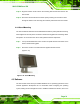
Figure 4-19).Step 2:
Figure 4-19: Stand Mounting
4.5 Software
The IOVU-572M comes with a pre-installed Windows CE 6.0 operating system and a rich
software application development kit. For information about configuring the operating
system, adding remote management tools or additional software and drivers, refer to the