
User guide


AFL2-W21A/AB-H61
Page 47
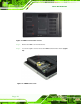
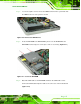
Step 2: Loosen the captive screw to release the HDD bracket from the system and slide
the HDD bracket out of the system as shown.
Figure 4-10: Remove the HDD Bracket
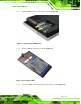
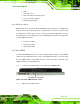
Step 3: Insert the DVD-ROM to the DVD-ROM bay and secure the DVD-ROM to the
DVD-ROM bracket using four screws (two screws on each side). (Figure 4-11)
Figure 4-11: Secure the DVD-ROM
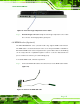
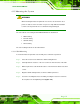
Step 4: Attach the SATA cable to the DVD-ROM and fasten the SATA cable screws.
Connect the SATA cable and power cable to the connectors on the motherboard.
(Figure 4-12).