
Manual

AFL2-12A-HM65 Series Panel PC
Page 45
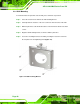
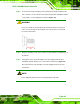
Step 6: Secure the HDD to the bracket using four (4) retention screws (two screws on
each side) (Figure
ٛ 4-5).
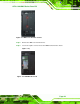
Figure
ٛ 4-5: Securing the HDD
Step 7: Slide the HDD module back into the device.
Step 8: Tighten the captive screw.
Step 9: Replace the HDD cover and secure it using two (2) retention screws. Step 0:
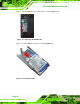
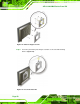
4.5 AT/ATX Mode Selection
AT and ATX power modes can both be used on the AFL2-12A-HM65. The selection is
made through an AT/ATX switch located on the I/O panel (Figure 4-6). To select AT mode
or ATX mode
, follow the steps below.
Step 1: Locate the AT/ATX switch on the I/O panel (Figure 4-6).