
User guide


AFL-4 Series-N270 User Manual
Page 49
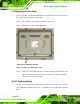
Figure 4-4: AFL-412A/AFL-415A/AE HDD Retention Screws
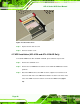
Step 4: Connect the SATA cable to the rear of HDD and the SATA connector on the
motherboard.
Step 5: Install the HDD into the AFL-412A/AFL-415A/AE by aligning the retention screw
holes in the HDD brackets with the retention screw holes on the chassis. Insert
the four retention screws.
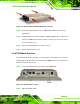
Step 6: Replace the aluminum back cover to the chassis.
Step 7: Replace the plastic back cover. Step 0:
4.8 AT/ATX Mode Selection
AT and ATX power modes can both be used on the AFL-4 Series-N270. The selection is
made through an AT/ATX switch on the bottom panel (
Figure 4-5). To select AT mode or
ATX mode, follow the steps below.
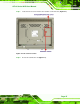
Step 1: Locate the AT/ATX switch on the bottom panel (
Figure 4-5).
Figure 4-5: AT/ATX Switch Location
Step 2: Adjust the AT/ATX switch. Step 0: