EN User Manual Washing Machine PTL7100PEX
CONTENTS Safety information Safety instructions Product description Control panel Programme Chart Consumption values Options Settings 2 3 5 5 6 8 9 10 Before first use Daily use Hints and tips Care and cleaning Troubleshooting Technical Data Installation 10 10 13 14 16 18 19 Subject to change without notice. SAFETY INFORMATION Before the installation and use of the appliance, carefully read the supplied instructions.
• • • • • • • • • Do not exceed the maximum load of 7 kg (refer to the "Programme chart" chapter). The operating water pressure at the water entry point from the outlet connection must be between 0.5 bar (0.05 MPa) and 8 bar (0.8 MPa). The ventilation opening in the base (if applicable) must not be covered by a carpet, mat, or any floor covering. The appliance must be connected to the water mains using the new supplied hose sets, or other new hose sets supplied by the Authorised Service Centre.
Electrical connection • The appliance must be earthed. • Always use a correctly installed shockproof socket. • Make sure that the parameters on the rating plate are compatible with the electrical ratings of the mains power supply. • Do not use multi-plug adapters and extension cables. • Make sure not to cause damage to the mains plug and to the mains cable. Should the mains cable need to be replaced, this must be carried out by our Authorised Service Centre.
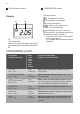
PRODUCT DESCRIPTION Appliance overview 1 1 2 3 4 5 2 3 5 Control panel Lid Lid handle Feet for levelling the appliance Rating plate 4 CONTROL PANEL Control panel description 1 2 3 4 TIME DELAY START OFF MINI 30 COTTON COTTON +PREWASH JEANS REFRESH 20 MIN COTTON ECO EASY IRON SYNTHETICS 90° 1000 60° 40° 900 DOOR LOCK 30° 700 DELICATE SPIN TEMP.
9 SPIN reduction button 10 TEMPERATURE button Display A • • • B • • A The delay start . When you press the delay start button, the display shows the delay start time. • B This area shows: - Programme duration - Programme is completed - Delay start hours - Alarm codes (refer to the chapter 'Troubleshooting') - Message of error. Incorrect option selection: the display shows this message for some seconds if: – You set a option that is not suitable for the programme.
Programme Temperature range Maxi‐ mum load Maxi‐ mum spin speed Programme description (Type of load and soil level) MIX 20° 20°C 2,5 kg 1000 rpm Special programme for cotton, synthetic and mixed fabrics lightly soiled. Select this programme to re‐ duce the energy consumption. Make sure that the detergent is suitable for low temperatures in order to have good washing results3). RINSE 2,5 kg 1000 rpm 4) To rinse and spin the laundry. All fabrics, except woollens and very delicate fabrics.
DELAY START EXTRA RINSE QUICK1) RINSE HOLD Programme SPIN Programme options compatibility COTTON ■ ■ ■ ■ ■ COTTON+ PREWASH ■ ■ ■ ■ ■ COTTON ECO ■ ■ ■ ■ SYNTHETICS ■ ■ ■ ■ ■ ■ ■ ■ ■ DELICATE WOOL ■ ■ ■ MIX 20° ■ ■ ■ ■ RINSE ■ ■ ■ ■ DRAIN ■ SPIN ■ EASY IRON ■ REFRESH 20 MIN ■ JEANS ■ ■ ■ ■ ■ ■ ■ MINI 30 ■ ■ 1) When you set this option, we recommend that you decrease the quantity of the laundry.
Programmes Load (kg) Energy consump‐ tion (kWh) Water consump‐ tion (litre) Approxi‐ mate pro‐ gramme duration (minutes) Remain‐ ing mois‐ ture (%)1) COTTON 60°C 7 1,16 58 197 60 COTTON 40°C 7 0,61 56 192 60 SYNTHETICS 40°C 3 0,45 46 105 37 DELICATE 40°C 2,5 0,55 46 90 37 WOOL2) 30°C 1,5 0,35 50 65 32 7 0,95 47 255 60 3,5 0,65 39 188 60 3,5 0,59 39 187 60 Standard cotton programmes Standard 60°C cot‐ ton Standard 60°C cot‐ ton Standard 40°C cot‐ ton 1) A
RINSE HOLD The related indicator comes on. Select this option to reduce creasing: • The washing programme ends with water in the drum. The drum turns regularly to reduce creasing. • The door stays locked. You must drain the water to unlock the door. EXTRA RINSE To drain the water refer to "Draining water out after the end of the cycle". QUICK With this option you can add some rinses to a washing programme. Use this option for persons allergic to detergents and in areas where the water is soft.
2. Push the button A. 5. Close the drum and the lid. A CAUTION! Before you close the lid of your appliance, make sure that you close the drum correctly. Detergent compartments. Using detergent and additives 1. Measure out specified detergents for washing machine the detergent and the fabric conditioner. The drum opens automatically. 3. Put the laundry in the drum, one item at a time. 4. Shake the items before you put them in the appliance. Make sure not to put too much laundry in the drum. 2.
1. Press the button DELAY START again and again until the display shows the delay you want to set. 2. Press the button START/PAUSE: • The lid is locked and the indicator DOOR LOCK is on. • The appliance starts the countdown. • When the countdown is completed, the programme starts automatically. You can cancel or change the set of the DELAY START option before you press the button START/PAUSE. After pressing the button START/ PAUSE you can only cancel the DELAY START option.
• Keep the lid ajar, to prevent the mildew and odours. The washing programme is completed, but there is water in the drum: • The drum turns regularly to prevent the creases in the laundry. • The indicator of button START/PAUSE flashes. The lid stays locked. • You must drain the water to open the lid. To drain the water: 1. Set a "Drain" or a "Spin" programme. If necessary, decrease the spin speed. 2. Press the button START/PAUSE. The appliance drains the water and spins. 3.
• Use the correct products for the type and colour of the fabric, the programme temperature and the level of soil. • If your appliance does not have the detergent dispenser with the flap device, add the liquid detergents with a dosing ball (supplied by the detergent's manufacturer). Ecological hints • Set a programme without the prewash phase to wash laundry with normal soil. • Always start a washing programme with the maximum load of laundry allowed.
Cleaning the detergent dispenser 1 2 1. 2. 1 2 3. 4. Cleaning the inlet hose and the valve filter 1. 2.
3. 4. 90˚ Frost precautions If the appliance is installed in an area where the temperature can be less than 0° C, remove the remaining water from the inlet hose and the drain pump. 1. Disconnect the mains plug from the mains socket. 2. Close the water tap. 3. Put the two ends of the inlet hose in a container and let the water flow out of the hose. 4. Empty the drain pump. Refer to the emergency drain procedure. 5. When the drain pump is empty, install the inlet hose again.
Possible failures Problem Possible solution The programme does not start. • • • • • • The appliance does not fill with water properly. • • • • • The appliance does not drain the water. • • • • • • The spin phase does not operate or the washing cycle lasts longer than usually. • • • • There is water on the floor. • • • Make sure that the mains plug is connected to the mains socket. Make sure that the appliance lid and drum doors are closed properly.
Problem Possible solution You cannot open the ap‐ pliance lid. • • Make sure that the washing programme is finished. Set the drain or the spin programme if there is water in the drum. The appliance makes an unusual noise. • Make sure the levelling of the appliance is correct. Refer to 'Installation'. Make sure that the packaging and/or the transit bolts are re‐ moved. Refer to 'Installation'. Add more laundry in the drum. The load may be too small. • • The washing results are not satisfactory.
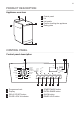
INSTALLATION WARNING! Refer to Safety chapters. Unpacking 1 2 1. 2. 2 1 2 3. 1 4.
Positioning Water supply FI 3/4” SE 1/2” NO 3/4” DK 3/4” 2 1 90O Drainage min.600 mm max.1000 mm ENVIRONMENTAL CONCERNS Recycle materials with the symbol . Put the packaging in relevant containers to recycle it. Help protect the environment and human health by recycling waste of electrical and electronic appliances. Do not dispose of appliances marked with the symbol with the household waste. Return the product to your local recycling facility or contact your municipal office.
* Hg Cd Cr6+ Hazardous substances PBBs PBDEs 1. This table is compiled according to SJ/T11364-2014. means this kind of hazard substance content in all the homogenous material of this part is under the limitation regulated 2. in GB/T26572-2011. 3. X means this kind of hazard substance content in at least one homogenous material of this part is above the limitation regulated in GB/T26572-2011. 4.
192935240-A-052018