
Installation Guide

Installation Steps
1
How To
Properly Weatherproof Housing
Apply a bead of silicone sealant/caulking around any
holes created for mounting, before attaching the
mounting plate Ⓑ to the wall.
Use sealing locknut where necessary. Optionally,
apply silicone sealant/caulking to the threads of any
electrical conduit entering the housing.
Adjust Direction of Camera
Gently press the camera ball and change the
direction of lens to get the best view.
Removing Protective Cover for Cleaning
Unscrew each cover at the bottom, wipe clean, and
reinstall. Cover Ⓒ should always be on to protect
against the elements.
Installing Accessory Visor
Screw on the Accessory Visor Ⓓ using two small
Phillips head screws, supplied with the visor, at the
top.
Download Mobile App
Download the iDter app and follow the in-app instructions. Visit idter.com for
further information about how to connect the light to the mobile app and how the
system works.
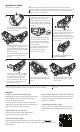
Turn off power at breaker.
3
Separate the two halves of the floodlight
by removing the two closure screws and
pivoting the hinge open.
6
Use power input connector to complete
wiring. Unscrew the three screws holding
on the metallic cover, below the large
metal power supply. Press tabs and
insert corresponding wire into connector.
Pull wire firmly to verify secure connec-
tion. Replace metallic cover.
7
Remove the white Molex connector at the
green circuit board, coming from the
power supply (depress the tab and gently
wiggle the connector to remove) and the
black grounding wire.
Lift the front half of Niō Floodlight straight
UP↑ off of the hinges of the Mounting
Plate Ⓑ.
Adjust the Mounting Plate Ⓑ to make
sure the air bubble in the level is in the
center. Firmly pull on the mounting
bracket to verify it is securely mounted
to the junction box.
Be sure to clean out ALL metal shavings
after drilling out mounting holes. Any
metal shavings that remain after
installation will void warranty.
2
Determine desired mounting location. If mounting on the wall, use the mounting
template Ⓕ to mark holes on the wall at positions shown on the template. make sure you
level the template. If making holes in the wall, apply waterproof caulking (see below)
before attaching the mounting plate.
8
Close the housing carefully, ensuring no wires get pinched. Ensure the gasket Ⓔ is in
place and tighten the closure screws to create a proper seal. Do not overtighten.
9
Return power to light, and ensure the unit
turns on.
4
Remove the existing light fixture. Install
the Mounting Plate, containing the power
supply, to the junction box. Use the
Junction Box Machine Screws Ⓖ to secure
the Mounting Plate Ⓑ (or use Mounting
Screw and Anchor Kit Ⓗ if not mounting to
junction box).
5
Choose one of the five conduit plugs to
remove and connect the electrical conduit
through it to supply power to the
floodlights. Typically, there would be a
ground wire between the housing and the
wall that would need to be disconnected
and reconnected.
Attach front half of Niō Floodlight to the
mounting plate Ⓑ by sliding it onto the
hinges.
Reconnect white Molex connector and
black grounding wire that were discon-
nected in Step 3.
Non Metallic UL Liquid Tight Electrical
Conduit is not supported.