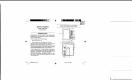
NATURES: MAIN U] REMOTE THERM __ MAINFEATURES:MAINUNMIT MODEL: RMR232PHA USER'S MANUAL INTRODUCTION] Congratulations on your purchase of the RMR2I2PHN/ RMR232PHU, an In-Ont Thermometer with Radio-Cantrell Clock and a Photo Frame. attached The basic package comes with the following: Main unit (RMR32PHN/RMR232PHL). + Remote therm sensor unit ® ~ Blue and metallic Grey exchangeable front key panels.
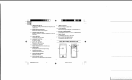
A THREE-LINE DISPLAY Facilities easy reading of remote and indoor temperatures and calendar clock B RADIO RECEPTION SIGNAL Indicates the condition of radio reception © MEMORY [MEM] BUTTON Recalls the maximum or minim temperature of main and remote unit D UP[ 4]BUTTON Advances the value of 4 setting E [MODE/SET 1 BUTTON Toggles the display modes and confirms entry while setting the values tor display DOWN{ ¥ J BUTTON Decreases the value of a sting G ALARM{ 4] BUTTON Displays the lama time or sets the alarm s
A LED INDICATOR Flashes when the remote writ transmits a reading PB BATTERY COMPARTMENT Accommodates two UM-3 or AZ C BATTERY BOOR size 1.5V batteries D WALL-MOUNT RECESSED HOLE Supports (he remote ul in walk-mounting BEFORE YOU BEGIN For best operation, 1. Insert batters for cremate units before doing so for the main unit 2. Place the main unit as close as possible next to the remote unit, eves the main unit after installing batteries.
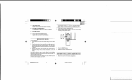
2. Install 2 alkaline batteries (MU-3 or “AA” size 1.5 V) strictly according to the polarities shown. 3 Replace the barney compartment door snd secure its screws. LOW BATTERY WARNING When it is dime to replace batteries, the respective low-battery indicator will Shaw up on the indoor of outdoor temperateness display. HOW TO INSERT A PHOTO 1. Push tie [UNLOCK] button to unlock and take out the photo frame drawer. k 2. Life and open the photo frame cover. 4.
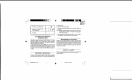
1 RMP232PHNA for FCO 5 COMPATIBLE PHOTO SIZES Three different standard sizes of photo ¢an bo placed in the photo frame: BxlZem (GAS x47) 9xl3am (B34" x52) 0x15 om (3947 x59") HOW TO USE THE TABLE STAND OR WALL MOUNTING “The main unit has a table stand which can support the unit on a fla surface. Ot you can mount the unit on a wall using the recessed sere hole, As for the remote unit, you can place it on a flat surface or mount the unit on a wal using the recessed screw hole.
7 | RMR23ZPHNA for FCC 8 THE RESET BUTTON This button is oily used when he unit is operating in an unfavorable way or malfunctioning, Use o blunt stylus to bold down the button All settings will return to their default values. GETTING STARTED Once: batteries are in place. for the remote unit, they will start transmitting temperature readings at 7-second intervals. The main unit will alo stars searching for signaler for about four trainees once batteries are installed.
The unit is in searching mode. Temperature readings are A securely registered. EEO Nao signals MAXIMUM AND MINIMUM TEMPERATURES The maximum and minimum recorded indoor and outdoor temperatures will be automatically stored in memory. To display then, press [ MEM ] once 10 display the maximum temperature and again the minimum temperature. The respective indicators, [MAX or MIN ] will be displayed. To clear the memory, bold down [| MEM 1 for two seconds. The petrolatum and minimum temperateness will be erased.
CALENDAR CLOCK DISPLAY MODES “The clock and the calendar share the same section of the display. “The calendar is displayed in a daemons format. il Each press on the [MODE ] button will toggle the display between clock and calendar mode.
| RMRZEZPHNA Tor FCG 9 HOW TO SET THE CALENDAR CLOCK MANUALLY “To set the lock mammal, hold | MODE/SET ] for two seconds in clock display mode, The §2-BR or 24-he display will blink. Use {A Jor[ ¥ to select 12 hour or 24 hour format Press [MODE/SET ] to confirm, Repeat the same procedure to set the hour, minutes, year, month, dy and display language. During the setting, press and hold [A Jor [| will increase or decrease the value rapidly. Note that the date is displayed in DAY-MONTH format.
PRECAUTIONS “This product is edginess to give you bears of satisfactory service if yom band if carefully. Here ace a few precautions: 1. Do not immerse the unit in water. w Do not clean the unit with abrasive or corrosive materials. They may scratch the plastic parts and corrode the electronic circuit Dio not subject the unit to excessive force, shock, dust temperance or turbidity, which may result in malfunction, shorter electronic life span, damaged battery and distorted parts.
7 | RMRZI2PHNA for FCC 1" Main unit +350g (without battery) Remote sensing weight + 46g (without battery) Dimension Main unit + 180(L) x 178CW) x 28¢T) man 44(W) x 21(T) mm NOTE ON COMPLIANCE This device complies with Part 1S of the FCC Rules. Operation is subject to the following two conditions: (1) This device may not cause harmful interference, and (2) This device must accept any interference revived, including interference that may cause undesired cessations.
CUSTOMER ASSISTANCE Should you require assistance regarding this product sad its operation, please contact our customer care department at $00-853$883 or vio email at help me Nonscientific WARRANTY ‘This product is warranted io be free of manufacturing defects fox a period of | year from date of retool purchase. Defective product shouts be directed to the place of foresail purchase for exchange.