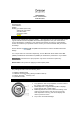
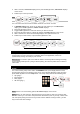
Ssmart Watch Model: SE900/RA900 USER MANUAL CONTENTS Introduction Package items Control Buttons Display Starting your watch (First Time) Setting Up Your Watch Set User Profile Set Watch Profile Update INTRODUCTION TM Thank you for selecting the Oregon Scientific Ssmart Watch as your sport mate that can be a great motivational tool compatible with downloaded application from your mobile device, such as Smartphone or tablet PC.
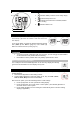
SCREEN DISPLAY 1 1. :Indicates battery status is low or nearly empty 2. :Indicates beep tone is off 3. 4. :Indicates exercise timer is activated; flashes when counting :Indicates alarm is on 2 3 4 START YOUR WATCH (FIRST TIME) After removing the watch from the package box, press and hold top (1) button to activate it until the screen has time display. Press top (1) button to switch the displays between default time (Time 1) and Time 2 (page X).
NOTE If you want to get back to the real-time display, return to the TIME setup mode and then press top (1) button. NOTE If the alarm is turned on, off. displays on the screen until you set the alarm setting to be NOTE You can independently set daily / weekday / weekend alarm. NOTE If your watch is low battery, the beep is automatically turned off without displays.
IMPORTANT Reset the user profile if the watch will be used by another person. NOTE You need to measure the stride, which is the maximum distance between your feet while attempting to walk. OREGON SCIENTIFIC APPLICATION Download the Oregon Scientific application from your mobile device. It is available in Apple App Store (iOS version) or Google Play Store (android version, coming soon). Different exercise profiles can be downloaded for free or purchased directly from the application.
2. Press and toggle middle (2) button on the watch to enter CONNECT mode. Press top (1) button to enter. 3. Tap CONNECT WITH WATCH on the mobile device to initiate synchronization while pressing top (1) button again on the watch. Done displays on the watch until successfully connect and download. Icon Meaning The mobile device is searching for the watch for connection. After connecting successfully, the downloading starts. NOTE If your battery is low, pls change batt.
UPDATE SYSTEM You could update the watch to an advanced system that Oregon Scientific offers in the future through the application, if applicable. The information should be directed to our website at www.oregonscientific.com. 1. In CONNECT mode, press top (1) button to enter and toggle middle (2) button to enter update system display. 2. Toggle top (1) button to enter below screens in order. The current watch system will be erased after your confirmation.
2. After 3 seconds, cali sensor displays, then press middle (2) button, add sensor displays on the screen. 3. Follow step 2 in the top section. NOTE You can pair all sensors with the watch at a time. REMOVE A SENSOR DEVICE You can remove the sensor from the watch. Remove one sensor at a time. 1. In SENSOR setup mode, press top (1) button to enter. When you see add sensor display, press middle (2) button, remove sensor displays. 2. Press top (1) button to enter. 3.
If you find that the sensor icons are flashing, please wait until the icons stop flashing and display on the screen. Lap setup 1. After entering setup screen, press middle (2) button to enter Lap setup. 2. Press top (1) button. If you want to setup for Auto Lap, press top (1) button again, or press middle (2) button to turn on Manual Lap. 3. Press middle (2) button to count by distance or press bottom (3) button to count by time.
3. Press top (1) button or press bottom (3) button to select from Fat burn 61-70%, Aerobic 71-80% or Anaerobic 81-90%. 4. Press middle (2) button to confirm selection. USEFUL REFERENCE Target Zone To help achieve maximum health benefits from your workout program, it is important to know your health index as shown below: Maximum Heart Rate (MHR) Upper heart rate limit Lower heart rate limit MHR is expressed in beats per minute.
professional to help you determine exercise frequency and duration appropriate for your age, condition and specific goals. VIEW EXERCISE RECORD DURING RUNNING You could start running by following the below steps, and if you set up the interval, the distance or timer will count down. NOTE Make sure the watch has enough memory, otherwise no memory displays when you press button after RUNNING mode. To view running records: 1.
To view exercise records: 1. In RUNNING mode, press bottom (3) button to enter running memory (mem). The screen displays the latest exercise date and time. Toggle middle (2) button to select the desired one, then press top (1) button to enter. NOTE If you want to clear all the memory, toggle middle (2) button until Clear all displays.
CYCLING PROFILE SETUP Except wheel size setting, you could set up all for cycling profile following by the SETUP section in RUNNING PROFILE, see page X. NOTE Make sure bike pod sensor is paired with the watch before cycling. The setup mainly includes the following parts: Lap (page ) Interval (page ) Rest (page ) HR Zone (page ) Wheel size (page ) Wheel size setup 1. In CYCLING mode, press top (1) button to enter, and the paired sensor icons display on the screen.
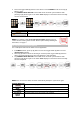
23-571 35-559 37-622 47-559 20-622 52-559 23-622 25-622 28-622 32-622 42-622 47-622 650 x 23C 26 x 1.50 700 x 35C 26 x 1.95 700 x 20C 26 x 2.0 700 x 23C 700 x 25C 700 x 28 700 x 32C 700 x 40C 700 x 47C 1909 1947 1958 2022 2051 2054 2070 2080 2101 2126 2189 2220 NOTE Wheel sizes on the above table are for reference only as wheel size depends on the wheel type and air pressure.
VIEW EXERCISE RECORD AFTER CYCLING You could view record after cycling on the watch by following the below steps. To view exercise records: 1. In CYCLING mode, press bottom (3) button to enter cycling memory (mem). The screen displays the latest exercise date and time. Toggle middle (2) button to select the desired one, then press top (1) button to enter. 2. 3. 4. 5. NOTE If you want to clear all the memory, toggle middle (2) button until Clear all displays.
SWIMMING PROFILE SETUP You can do swimming setup on the watch. In SWIMMING mode, press top (1) button to enter setup mode. The setup mainly includes the following parts: Swim type (page ) Pool size (page ) Calibration (page ) Swim type setup 1. In SWIMMING mode, press top (1) button to enter setup mode. 2. Press middle (2) button to enter swim type mode, then press top (1) button or press bottom (3) button to select from ft.
VIEW EXERCISE RECORD DURING SWIMMING You could start swimming by following the below steps. NOTE Make sure the watch has enough memory, otherwise no memory displays when you press button after SWIMMING mode. To view swimming records: 1. In SWIMMING mode, press top (1) button to enter start mode. 2. Toggle middle (2) button to select swim type and pool size (see above sections). 3. The watch starts counting.
(1) button to enter. NOTE If you want to clear all the memory, toggle middle (2) button until Clear all displays. Press top (1) button to enter, then press top (1) button again to select yes to confirm deletion of the memory; or press bottom (3) button to select no to go back to the record screen. 2. Press top (1) button to enter View Summary screen. Press top (1) button again to start viewing, then toggle middle (2) button to view the records. OR Press bottom (3) button to exit. 3.
WORKOUT PROFILE SETUP Before doing strength training, you can do workout setup on the watch. In WORKOUT mode, press top (1) button to enter setup mode. The setup mainly includes the following parts: Sets (page ) Reputations (page ) Rest time (page ) Met Or, you can skip setup by pressing skip in setup mode; the watch automatically counts the sets (default value=3 sets), reputations (default value=12 reputations), rest time (default value =15 seconds) and met (default value=3).
3. Press top (1) button to increase the value or press bottom (3) button to decrease the value. 4. Press middle (2) button to confirm selection. NOTE Reputation setup range is 1-99 reputation(s). Rest time setup 1. In WORKOUT mode, press top (1) button to enter setup mode. 2. Press middle (2) button to enter yes in setup mode. Press top (1) button and then toggle middle (2) button until Rest time mode displays. 3. Press top (1) button to increase the value or press bottom (3) button to decrease the value.
VIEW EXERCISE RECORD DURING WORKOUT After setup for the MET value (page X) on the watch, you can start the workout. The watch counts automatically. You can see the reputation and time counting, and the rest time counts down on the screen to remind you. You can press top (1) button to pause. If you decide to stop the workout, press bottom (3) button. Total calorie output and time display on the screen. The display goes back to WORKOUT mode after 3 seconds.
3. Tap OVERALL RESULT to enter. Then you can tap WEEK, MONTH and ANNUAL to view each overall result chart. Swipe the screen to left or right to view chart by each time unit. Tap each bar of the chart, the particular data pops up, tap again to make it disappeared. Tap icon to share the data on facebook.com. 4. Tap on the screen to exit.
“Adults need at least 2 hours and 30 minutes (150 minutes) of moderate-intensity.” Aerobic activity (i.e. brisk walking) every week and muscle strengthening activities on 2 or more days a week that works a major muscle groups (legs, hips, back, abdomen, chest, should and arms).” Level Activity Intensity 1 Steps/Min Male Female Rest <60 <60 2 Light (<=2.99 METs) 60-96 60-107 3 Moderate (3.0-5.99 METs) 96-124 107-135 4 Hard (6.0-8.99 METs) 125-153 136-162 5 Very hard (>=9.
Swipe the screen to left or right to view other set of records. Tap icon to share the data on facebook.com. 3. Tap OVERALL RESULT to enter. Then you can tap WEEK, MONTH and ANNUAL to view each overall result chart. Swipe the screen to left or right to view chart by each time unit. Tap each bar of the chart, the particular data pops up, tap again to make it disappeared. Tap icon to share the data on facebook.com. 4. Tap on the screen to exit.
VIEW WEATHER IN APPLICATION You can only view the temperature and forecasted weather on the watch. HIKING PROFILE You can use hiking profile to setup and monitor different values, such as distance, altitude and sea level pressure, etc. The setup mainly includes the following parts: Altitude Sea level SETUP You need to input the value of altitude and sea level before starting hiking. You could browse your local weather station website for details of your living area or particular city.
VIEW RECORD AFTER HIKING You could view the records after hiking. The record in log form is ordered by date and time. To view log: 1. In HIKING mode, press bottom (3) button to enter memory mode.You will see the total number of free time logs, date and time. 2. Toggle middle (2) button to select the desired record. 3. Press top (1) button to enter. 4.
FISHING PROFILE You can use FISHING profile to forecast the best harvest time range for fishing at your location in next 14 days. You need to setup before use. The setup mainly includes the following parts: Latitude Longitude SETUP Please follow the below steps: Latitude and longitude setup: 1. In FISHING mode, press top (1) button to enter setup mode. 2. Toggle middle (2) button to enter latitude and longitude mode.
VIEW FISHING RECORD IN APPLICATION You could upload the memory to your application and view the forecasted fishing harvest location on the map. 1. Enter the profiles page in your application. Tap FISHING profile icon. 2. On the map, there is a purple pin on the forecasted location with the latitude and longitude, or tap to display your current location. 3. Tap on the screen to exit. WATER RESISTANCE The Ssmart watch is water-resistant up to 5ATM (50 meters or 164 feet).
REPLACE BATTERY CLOCK Time format Date format Year range Alarm 12/24 hour format with hour / minute / second DD / MM or MM / DD 2012 - 2061 Alarm with daily, weekday or weekend settings Only available for time 1 TRAINING Exercise time range Rest time range Target heart rate zone Heart rate range Distance measurement range Step measurement range Step timer range Maximum lap count Cadence measurement range Step measurement range Maximum lap count Cadence measurement range Number of interval training Calori
Do not tamper with the internal components. Doing so will terminate the product warranty and may cause damage. The main unit contains no user-serviceable parts. Do not scratch hard objects against the LCD display as this may cause damage. Take precautions when handling all battery types. Remove the batteries whenever you are planning to store the product for a long period of time. When replacing batteries, use new batteries as specified in this user manual.
determined by turning the equipment off and on, the user is encouraged to try to correct the interference by one or more of the following measures: Reorient or relocate the receiving antenna. Increase the separation between the equipment and receiver. Connect the equipment into an outlet on a circuit different from that to which the receiver is connected. Consult the dealer or an experienced radio / TV technician for help.