
Datasheet


6
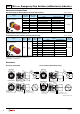
Nameplate (for ø22 Emergency Stop Switches)
Description Legend PartNo. OrderingNo.
Package
Quantity
Material PlateColor LegendColor
Forø38/40mm
Button
(blank) HWAV-0-Y HWAV-0-Y
1 Polyamide Yellow
—
EMERGENCYSTOP HWAV-27-Y HWAV-27-Y
Black
EMERGENCYOFF HWAV-74-Y HWAV-74-Y
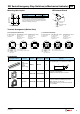
Maintenance Parts
Description&Shape Material PartNo. OrderingNo.
Package
Quantity
Remarks
LockingRing
Polyamide CW9Z-LN CW9Z-LNPN05 5
•Black
• ø27.8,t=5.0
•Panelthicknesswhenusingthe
nameplate:1.0to2.5mm
Dimensions
Nameplate for ø38/40
Button
ø60
ø22
1.01.5
E
M
E
R
G
E
N
C
Y
S
T
O
P
Projections
Safety Precautions
•TurnoffpowertotheXWseriesemergencystopswitchbefore
startinginstallation,removal,wiring,maintenance,andinspection
oftherelays.Failuretoturnpoweroffmaycauseelectricalshock
orfirehazard.
•Forwiring,usewiresofthepropersizetomeetthevoltageand
currentrequirements.TightentheM3terminalscrewtoatighten-
ingtorqueof0.6to1.0N·m.Failuretotightentheterminalscrews
maycauseoverheatingandfire.
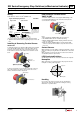
Instructions
Removing the Contact Block
Firstunlocktheoperatorbutton.Grabthebayonetring andpull
backthebayonetringuntilthelatchpinclicks ,thenturnthe
contactblockcounterclockwiseandpullout .
Turn counterclockwise
Bayonet Ring
Grab
Grab
Pull
Notes for removing the contact block
1. Whenthecontactblockisremoved,themonitorcontact(NO
contact)isclosed.
2.Whileremovingthecontactblock,donotexertexcessiveforce,
otherwisetheswitchmaybedamaged.
3.AnLEDlampisbuiltintothecontactblockforilluminated
pushbuttons.Whenremovingthecontactblock,pullthecontact
blockstraighttopreventdamagetotheLED
lamp.Ifexcessiveforceisexerted,theLEDlampmaybedam-
agedandfailtolight.
Panel Mounting
Removethelockingringfromtheoperator.Inserttheoperatorfrom
panelfrontintothepanelhole.Facethesidewithoutthreadonthe
operatorwithTOPmarkingupward,andtightenthelockingring
usingringwrenchMW9Z-T1toatorqueof2.0N·mmaximum.
Operator without thread
TOP marking
Rubber Gasket
Locking Ring
Installing the Contact Block
Firstunlocktheoperatorbutton.Alignthesmall markingon
theedgeoftheoperatorwiththesmall markingontheyellow
bayonetring.Holdthecontactblock,notthebayonetring.Pressthe
contactblockontotheoperatorandturnthecontactblockclockwise
untilthebayonetringclicks.
marking
marking
Push
Turn clockwise
Notes for installing the contact block
Makesurethatthebayonetringisinthelockedposition.Checkthat
thetwoprojectionsonthebayonetringaresecurelyinplace.
Latched
Projections
Unlatched
ø22
XW Series Emergency Stop Switches (w/Mechanical Indicator)
Alldimensionsinmm.
(13/04/04)