
Manual

WindO/I-NV2 User’s Manual 34-69
5 HG3F/4F
34
MICRO/I Specifications
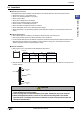
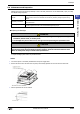
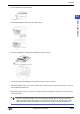
3 Peel the protective film on the window.
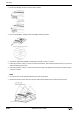
4 Remove the backlight connector from the inverter module.
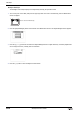
5 Draw out the backlight , pushing the tab of backlight omission prevention.
6 Connect the replacement backlight by following the procedure in step 5 in reverse.
7 Follow the procedure in step 4 in reverse to connect the connector, then follow the procedure in step 3 in reverse to
stick an attached protection film.
8 Follow the procedure in step 2 in reverse to front and rear cases, then tighten the screws at the rear panel (torque:
0.5 N•m to 0.6N•m)
The HG4F uses two different types of replacement backlights depending on the production date. When
ordering a replacement backlight, look for the Replacement Backlight Type No. label on the back of the
HG4F. For the label position, see the figure of “5.3 Part Names” on page 34-59. When the label is found,
specify HG9Z-4FB1 or HG9Z-4FB2 indicated on the label. If the label is not found, specify HG9Z-4FB1.