
Manual

WindO/I-NV2 User’s Manual 31-1
31
Printer
This chapter describes the functions of the MICRO/I when using a printer, and how to connect it.
1.1 Functions Available with the Printer
These functions are available when a printer is connected to the MICRO/I.
• Printing screenshots
Refer to Chapter 8 “4 Print Button” on page 8-51, and Chapter 12 “4 Print Command” on page 12-25.
• Printing alarm logs
Refer to Chapter 13 “Alarm Log Function” on page 13-1.
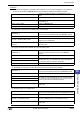
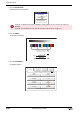
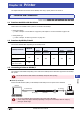
1.2 Functions by MICRO/I Model
The functions available differ depending on the MICRO/I model.
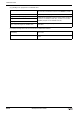
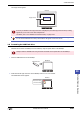
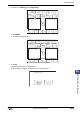
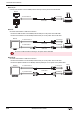
1.3 Connecting a Printer to MICRO/I
The connection method differs depending on the model of the MICRO/I and the interfaces supported on the MICRO/I
and printer.
●
HG2G-5F, HG3G/4G
Connect the USB interface (USB1) on the MICRO/I and the USB port on the printer with a USB cable.
Chapter 31 Printer
1 Functions and Connections
HG3G
HG2G-5FHG2G-5SHG2G-S
HG4G HG1F HG2F HG2S HG3F HG4F
MICRO/I functions
HG2G-5F,
HG3G/4G
HG1F/2S HG2F HG3F/4F
USB
Serial
Interface 2
Serial
Interface 2
USB
Serial
Interface 2
Parallel
Interface
Printing screenshots
YES
YES YES YES YES YES
Printing alarm logs
(Batch output)
Printing alarm logs
(Real Time output)
NO
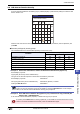
Do not disconnect the cable between the MICRO/I and printer while printing.
HG3G
HG2G-5F
HG4G
(
USB1
)
MICRO/I
Printer
USB cable
To USB portTo USB interface
Mini-B plug A plug
• Do not use a USB hub when connecting to the printer with a USB cable.
• Printed images may appear differently depending on the printer used. Always check the image by
printing an actual image.