
Installation Guide

Important Note: Warning
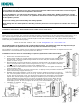
Prior to drilling any new holes in your door, please ensure that the width of the inside frame is wide enough for
the inside latch and deadbolt. See Template for instructions.
For new installations, you will require the following: electric drill, cutting pliers, Phillips screwdriver, and the
following drill bits: 1/16”, 5/16” and a 7/8” spade bore drill bit. A hack saw may be required if you would like to
cut the spindles yourself.
Always wear safety glass when drilling and cutting spindles.
When drilling into door with spade bore drill bit, pre-drill a pilot hole. A second person to hold the door steady is
helpful.
Installation Instructions: SK1215 Deluxe lever handle set for storm Doors.
Included in this package: Outside lever handle, inside latch, inside deadbolt, strikes, spindles, screws,
Thank you for your purchase. The screws and spindles included in this package are for door thicknesses ranging from 1” to 2-
1/8”. Several lengths of spindles and screws are included Although we have made every attempt to make this package
complete, if you are missing any screws or spindle length to make this suitable for your door, please contact us and we will
ensure that your product functions properly.
Please call: 800-361-2236 ext. 234.* e-mail: ideal@idealinc.com * www.idealinc.com
The outside handle can be used for left or right handed openings. The handle will rotate 360 degrees until you
insert the spindle. The spindle locks the lever in position and activates the spring.
For installation on new doors, please visit our website for additional installation information. A template from the door
manufacturer is recommended as many door profiles are different.
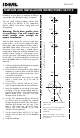
Installation on doors where no new drilling is required (replacement of the same model):
1. Remove the old handle from the door.
2. Rotate outside handle into normal operating position and insert spindle into the outside handle
from the back. Guide the spindle through outside of the door and place handle assembly into
position as shown in Fig 1.
3. With the handle on and the spindle firmly seated into outside handle, the spindle must project at
least ¼”
through inside of door, and not longer than 3/8” (Fig. 2). If the spindles included are
too long, you can cut to length or contact us for additional ones.
4. Fasten handle to inside latch with machine screws provided. Do not over tighten as this may
cause the latch to bind.
5. Attach nylon strike (shim if necessary) with the #6 x 1” tapping screws provided to wooden door
jamb so strike firmly engages latch (Fig. 3)
6. Deadbolt and spindle installation: From the inside, slide the spindle through door into the key
lock. Once the spindle reaches as far as it can go, it must stick out at least 3/8” through inside
of door, but not longer than 7/16”. Cut off beyond that point with cutting pliers. Place deadbolt
against door with flat spindle engaged. Holding the deadbolt in place, but without the screws,
test the deadbolt by turning the key. If it binds, the spindle may be too long. When the key
turns freely and the deadbolt functions fasten the deadbolt to the door with 2 #6 x 1” pan
head tapping screws. Do not over tighten as this may cause the deadbolt to bind. (Fig. 4).
7. Installation is complete. (Fig. 5).
For more information and tips about this product, please visit www.idealinc.com/instructions/SK1215