
Operation Manual


Chapter 10
IDEAL DataCENTER Software
100
10.7. Produce and print reports
To create and print reports on tests and corresponding test records, use the Print function.
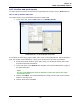
10.7.1. Set up header and footer
The report can be set up with header and footer and printed.
1. In the menu bar, click on File and then on Header/Footer.
Illustration 10.7.1. Set up header and footer
It is possible to add a logo, page number, date, time or self-designed text. When selecting a
logo, the location of the Bitmap file (.bmp) to be used as the logo must be provided.
2. Select the desired positions (left, right, center) in the header and/or footer and
provide the desired information.
3. In the logo area, select Search and navigate to the desired Bitmap file (.bmp) in
the open dialog box.
NOTE:
The size of the Bitmap file must be adjusted to obtain the desired size when
printing the reports.
4. Confirm with Open. The selected Bitmap file (.bmp) and the path to the location
appear in the logo area.
5. Confirm preferences with OK.