
Installation Instructions
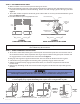


2"
2"
EDGE OF OPENING
CURTAIN WIDTH + 1"
FASTENER LOCATION
FOR ALL JAMBS
FIGURE 7
DOOR CROSS SECTION
A. Attach brackets and guides to jambs using fasteners shown in table 1.
B. The guides should be mounted centered about the opening and spaced curtain width + 1" apart measured
from back of guide to back of guide. See figure 7. Both guides must be plumb.
C. The appropriate fastener must be installed at each hole location in brackets and guides. See table 1.
GUIDES AND BRACKETS TO JAMB
STEP 5:
None
DRILL SIZE
TABLE 1: Wall Fasteners included for jamb attachment of Brackets and Guides.
ITEM
JAMB
FASTENERS
Brackets
and
Guides
Wood
Concrete or Filled Block
None
None
Steel-Structural 1/4”-14 x 1” TEKS Screw
1/4”-10 x 1” Lag Screw
NoneSteel-Rollup Frame 1/4”-14 x 7/8” Stitch TEKS Screw
5/16” X 2-14” Tapcon XL Masonry Screw
WARNING!
Door can fall if both brackets are not securely fastened to the jambs.
All fasteners attaching brackets to jambs must fit securely into a
structural member or surface. If door falls, serious injury or death
and/or damage to door can result.
FLOOR
OO
PP
EE
NN
II
NN
GG
FIGURE 6
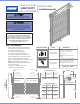
LIFTING DOOR ASSEMBLY
LIFTING DOOR ASSEMBLY
STEP 4:
A. Move door and guide assemblies toward wall opening with bottom
of guides resting next to jambs.
B. Lift door assembly evenly, pivoting around bottom of guides. See figure 6.
WARNING!
Two installers are required to lift door assembly into position
against jambs. The guides are not designed to support the door
weight during a one man installation. Attempting installation with
only one installer can result in serious injury and/or damage to door.
Do not leave door unattended until it is securely attached to jambs.
STEP 6: SETTING INITIAL SPRING TENSION
A. Rotate door 1-1/2 revolutions in the direction that would send the bottom bar down through the guides.
coil. Direct the bottom bar down into the guides, stopping just past the head stop area and hold securely
through completion of step 7.
B. cut the tape and plastic wrap that holds the door in aWhile firmly holding the door at the bottom bar,
WARNING!
Extreme spring tension can cause serious injury or death. Installation, repairs and adjustments must be made by a
trained rolling service door systems technician using proper tools and instructions.
Door must be fully opened when making adjustments.
NOTE:
Welding of guides to the jambs is not recommended.
revised 1/12/12
3