Electro-Hydraulic / UTV Lift Bench with Retractable Ramp U-2200IEH-XR Capacity 2,200lbs Installation, Operation & Maintenance Manual Oct.
CONTENT 1. Safety Information 1.1 Note, Caution and Warning 1.2 Important Information 1.3 Safety Instructions 1.4 Caution and Warning Labels 2. Technical Specifications 2.1 Product Description 2.2 Product Specifications 2.3 Hydraulic Schematic 2.4 Circuit Diagram 3. Preparing and Installation 3.1 Site Selection 3.2 Surface Condition 3.3 Necessary Tools 3.4 Personal Protective Equipment 3.5 Set-Up & Installation 4. Operation 4.1 Operation Instructions 5. Maintenance Instructions 6.
1. Safety Information 1.1 Note, Caution and Warning This document uses the following conventions—Note, Caution and Warning – to alert you to special instructions, tips, or hazards for a given procedure. Please familiarize yourself with the conventions described below. Indicates important information that requires special attention, such as a procedure for a specific vehicle, or tips on operating the equipment.
5. Keep everyone clear of the lift when the lift is moving, the locking mechanism is disengaged, or the vehicle is in danger of falling. 6. Unauthorized personnel should never be in the shop area when the lift is in use. 7. Inspect the lift daily. The lift should never be operated if it has damaged components, or is malfunctioning. Only qualified technicians should service the lift. Replace damaged components with manufacturer’s parts, or equivalent. 8. Keep the area around the lift clear of obstacles. 9.
1.4 Caution and Warning Labels 5 Oct.
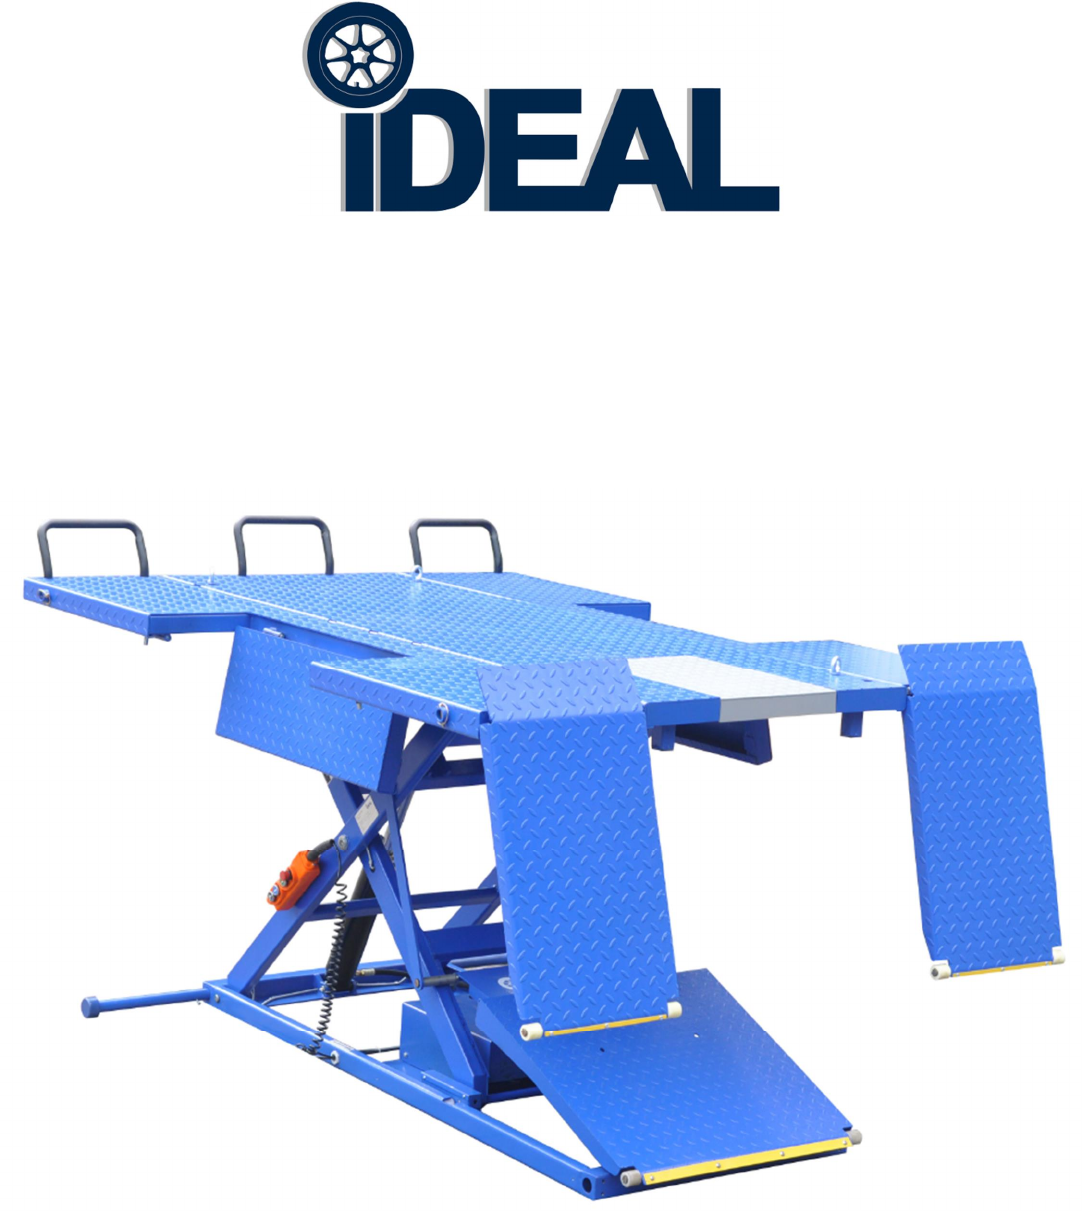
2. Technical Specifications 2.1 Product Description The U-2200IEH-XR UTV lift bench is used for repairing and maintaining Side by Side Utility type Vehicles by 110VAC-60Hz, 1Ph power source incorporating the latest safety technologies. The U-2200IEH-XR is designed and manufactured for a max lifting capacity of 2,200 lbs. (1,000kg), and is fully capable for lifting most all UTV Side by Side Vehicles, while safely holding them in an elevated, locked height position.
U-2200IEH-XR Dimension Drawings 7 Oct.
2.3 Hydraulic Schematic 1. OIL TANK 2. MESH 3. GEAR PUMP 4. MOTOR 5. ONE-WAY VALVE 6. MESH 7. SOLENOID VALVE 8. RESTRICTOR VALVE 9. RELIEF VALVE 10. RESTRICTOR VALVE 11. CYLINDER 12. PIPE S B 0 2.
3. Preparing and Installation 3.1 Site Selection The hydraulic UTV lift is designed only for indoor use. Application in a room with explosion hazard is not permitted. Setting in a wet place, a car wash bay for instance, is also not recommended. Make sure to check the desired location for possible obstructions such as a low ceiling, overhead lines, adequate working area, access ways, exits, etc. 3.
2. Power Connection Before power connection is made, check your power supply outlet to ensure it’s in accordance with the requirements of the lift. a. Connect lift’s electrical plug to a 110V-60Hz, 1Ph, 20A power supply outlet. Protection against power surges shall be provided by the user. 3. Starting Up (No Load on Lift) a. Using the Remote Pendant Control, raise the platform to full height by pressing the (GREEN) UP↑button. (Fig. 2) b. Lower the lift to floor by pressing the (BLUE) DOWN↓button. c.
5. Change the Tank Plug a. Remove ‘black’ shipping Plug from reservoir tank and replace with the ‘brass’ ventilating Plug - (Figs 8 & 9) Fig. 8 Fig. 9 The Lift is now ready for Operation 4. Operation Be sure to read and familiarize yourself with the Safety Instructions at the beginning of this manual. Be sure to wear gloves, protection glasses and all necessary personal protective equipment. Failure to follow Safety Instructions may result in property damage, personal injury or death. 4.
3. To Raise Lift & Lock a. Push (GREEN) UP↑button on the remote ‘hand held’ pendant controller. b. Raise vehicle to the desired height, then release the (GREEN) UP↑button. c. Push the (BLACK) PARKING button to lower the vehicle onto the locking position, as the locking latches will automatically engage. 4. (Emergency Button) · The lift can be switched off immediately by pressing down the (RED) Emergency button on Remote Pendant Control.
5. Maintenance Instructions Contact your service provider for instructions before starting up if you are not completely familiar with lift’s maintenance procedures. Only qualified personnel can perform maintenance on this equipment. Any failure in operation may cause personal injury and/or damage to lift. Daily: ü Wear necessary protective equipment before use, includes, but not limited, gloves and protection glasses, working suits and shoes. ü Always keep bolts tight. Check periodically.
6. Exploded Views & Parts Lists Exploded Views – (Lift Structure) 14 Oct.
Exploded Views – (Lift Structure) 15 Oct.
Exploded Views – (Lift Structure) Parts List - (Lift Structure) ITEM 3 4 5 6 7 8 9 10 11 12 13 14 15 16 17 18 27 Tux P/N M-2200IEH-XR-003 M-2200IEH-XR-004 M-2200IEH-XR-005 M-2200IEH-XR-006 M-2200IEH-XR-007 M-2200IEH-XR-008 M-2200IEH-XR-009 M-2200IEH-XR-010 M-2200IEH-XR-011 M-2200IEH-XR-012 M-2200IEH-XR-013 M-2200IEH-XR-014 M-2200IEH-XR-015 M-2200IEH-XR-016 M-2200IEH-XR-017 M-2200IEH-XR-018 M-2200IEH-XR-027 M-Ref P/N JP23-08000-E00 JP23-01000-E00 JP17-00011-000 JP02-00009-000 JP23-00003-E00 5202-00006-000
29 30 31 32 33 34 35 36 37 38 39 40 40-1 40-2 40-3 40-4 40-5 40-6 40-7 40-8 40-9 40-10 40-11 40-12 40-13 40-14 40-15 40-16 40-17 41 42 43 44 44-1 45 46 47 48 49 49-1 50 50-1 51 52 53 54A 54-1 54-2 M-2200IEH-XR-029 M-2200IEH-XR-030 M-2200IEH-XR-031 M-2200IEH-XR-032 M-2200IEH-XR-033 M-2200IEH-XR-034 M-2200IEH-XR-035 M-2200IEH-XR-036 M-2200IEH-XR-037 M-2200IEH-XR-038 M-2200IEH-XR-039 M-2200IEH-XR-040 M-2200IEH-XR-040.1 M-2200IEH-XR-040.2 M-2200IEH-XR-040.3 M-2200IEH-XR-040.4 M-2200IEH-XR-040.
54-3 54-4 54-5 54-6 54-7 54A-8 54-9 54-10 54-11 54-12 54-13 54-14 54A-16 55-1 56 57 58 59 61 62 63 64 65 66 67 68 71 72 73 74 75 76 77 78 79 80 81 82 83 86 87 M-2200IEH-XR-054.3 M-2200IEH-XR-054.4 M-2200IEH-XR-054.5 M-2200IEH-XR-054.6 M-2200IEH-XR-054.7 M-2200IEH-XR-054A.8 M-2200IEH-XR-054.9 M-2200IEH-XR-054.10 M-2200IEH-XR-054.11 M-2200IEH-XR-054.12 M-2200IEH-XR-054.13 M-2200IEH-XR-054.14 M-2200IEH-XR-054A.16 M-2200IEH-XR-055.
P8 P9 P10 P11 P12 P13 P13-1 P14 P15 U-2200IEH-XR-P8 U-2200IEH-XR-P9 U-2200IEH-XR-P10 U-2200IEH-XR-P11 U-2200IEH-XR-P12 U-2200IEH-XR-P13 U-2200IEH-XR-P13.
Parts List – (Power Unit) ITEM 1 2 3 4 5 6 7 8 9 10 11 12 13 14 15 16 17 18 19 20 21 22 23 24 25 26 27 28 29 30 31 32 33 34 35 36 37 38 39 40 41 42 Tux P/N M-2200IEH-PU-001 M-2200IEH-PU-002 M-2200IEH-PU-003 M-2200IEH-PU-004 M-2200IEH-PU-005 M-2200IEH-PU-006 M-2200IEH-PU-007 M-2200IEH-PU-008 M-2200IEH-PU-009 M-2200IEH-PU-010 M-2200IEH-PU-011 M-2200IEH-PU-012 M-2200IEH-PU-013 M-2200IEH-PU-014 M-2200IEH-PU-015 M-2200IEH-PU-016 M-2200IEH-PU-017 M-2200IEH-PU-018 M-2200IEH-PU-019 M-2200IEH-PU-020 M-2200IEH-PU-02
Exploded View – (Control Box) 2 1 24 19 14 13 15 25 23 22 20 21 16 17 4 18 5 3 12 6 11 10 9 6 8 7 Parts List – (Control Box) ITEM 1 2 3 4 5 6 7 8 9 10 11 12 13 14 15 16 17 18 19 20 21 22 23 24 25 Tux P/N M-2200IEH-CB-001 M-2200IEH-CB-002 M-2200IEH-CB-003 M-2200IEH-CB-004 M-2200IEH-CB-005 M-2200IEH-CB-006 M-2200IEH-CB-007 M-2200IEH-CB-008 M-2200IEH-CB-009 M-2200IEH-CB-010 M-2200IEH-CB-011 M-2200IEH-CB-012 M-2200IEH-CB-013 M-2200IEH-CB-014 M-2200IEH-CB-015 M-2200IEH-CB-016 M-2200IEH-CB-017 M-2
7. Troubleshooting Guide A. Problem Motor does not run. B. Possible cause: 1. Blown fuse or circuit breaker. 2. Incorrect voltage to motor. 3. Bad wiring connections. 4. Motor up switch burned out. 5. Overhead limit switch burned out. 6. Motor windings burned out. Problem Solution: 1. Replace fuse or reset circuit breaker. 2. Supply correct voltage to motor. 3. Repair and insulate all connections. 4. Replace switch. 5. Replace switch. 6. Replace motor. Motor runs but lift will not raise. C.
LIMITED WARRANTY Structural Warranty: The following parts and structural components carry a five year warranty: Columns Tracks Arms Cross Rails Uprights Top Rail Beam Swivel Pins Legs Carriages Overhead Beam Limited One-Year Warranty: Tuxedo Distributors, LLC (iDEAL) offers a limited one-year warranty to the original purchaser of Lifts and Wheel Service equipment in the United States and Canada.