
Owner's Manual

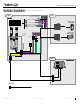


Table Of Contents
- DSP Harnesses with Software Installation Instructions
- Install Guide (Using DSR-1)
- Install Guide (Using Maestro AR)
- ADS-AR-AS-DFO2 (harness version 1.2)
- Ford Cmax With dFO2 (version 1.2) 2013-2018
- Ford Edge With dFO2 (version 1.2) 2011-2019
- Ford Escape With dFO2 (version 1.2) 2013-2019
- Ford Expedition With dFO2 (version 1.2) 2015-2020
- Ford Explorer With dFO2 (version 1.2) 2011-2019
- Ford F Super Duty With dFO2 (version 1.2) 2017-2020
- Ford F150 With dFO2 (version 1.2) 2013-2020
- Ford Focus With dFO2 (version 1.2) 2012-2018
- Ford Fusion With dFO2 (version 1.2) 2013-2019
- Ford Mustang With dFO2 (version 1.2) 2015-2020
- Ford Taurus With dFO2 (version 1.2) 2013-2019
- Ford Transit Connect With dFO2 (version 1.2) 2014-2019
- Ford Transit With dFO2 (version 1.2) 2015-2019
- ADS-AR-AS-DFO2 (harness version 2.0)
- Ford Cmax With dFO2 (version 2.0) 2013-2018
- Ford Edge With dFO2 (version 2.0) 2011-2019
- Ford Escape With dFO2 (version 2.0) 2013-2019
- Ford Expedition With dFO2 (version 2.0) 2015-2020
- Ford Explorer With dFO2 (version 2.0) 2011-2019
- Ford F Super Duty With dFO2 (version 2.0) 2017-2020
- Ford F150 With dFO2 (version 2.0) 2013-2020
- Ford Focus With dFO2 (version 2.0) 2012-2018
- Ford Fusion With dFO2 (version 2.0) 2013-2019
- Ford Mustang With dFO2 (version 2.0) 2015-2020
- Ford Taurus With dFO2 (version 2.0) 2013-2019
- Ford Transit Connect With dFO2 (version 2.0) 2014-2019
- Ford Transit With dFO2 (version 2.0) 2015-2019
- ADS-AR-AS-DFO2 (harness version 1.2)

ADS-AR-AS-DFO2-IG-EN maestro.idatalink.com
FORD EDGE WITH DFO2 (VERSION 2.0) 20112019
Automotive Data Solutions Inc. © 2021
5
INSTALLATION INSTRUCTIONS
For 4-channel amplifi er and subwoofer amp
Required : dFO2 t-harness (version 2.0), ACC-RCA1
STEP 1
• Remove the factory radio and plug the dFO2 T-harness in
line with the radio plug.
• Locate the 26 pin secondary harness that was plugged into
the OEM radio.
• Locate the 2 pin cable with the Black and Black/White
wires and plug the terminal with the Black/White wire on
it into pin 4 of the 26 pin connector. Plug the terminal with
the Black wire into pin 17 of the 26 pin connector. Connect
the other end of the 2 pin cable into the mating black
connector with Black and Black/White wires from the dFO2
harness. (refer to wiring diagram).
STEP 2
• Cut and remove the Gray and Purple 4 pin connectors
and connect the wires from the dFO2 T-harness to the
aftermarket amplifi er.
Note 1:
If you are running your own speaker wires from the
amplifi er to the speakers, this step is not necessary.
• Connect the male White 4 pin connector to the female
White connector.
• Connect the male Green 4 pin connector to the female
Green connector.
• Plug the RCA1 harness into the dFO2 T-Harness.
• Connect the RCA1 Output 1 to the front inputs of the
amplifi er.
• Connect the RCA1 Output 2 to the subwoofer input of the
amplifi er.
Note: Output 2 is a non-fading, full range signal coming
out the radio. What that means is the output is not
affected by the radio’s fader control (front to back speaker
adjustment) and the signal coming from the radio plays
all frequencies, not just subwoofer frequencies. Your
subwoofer amp needs to have a subwoofer crossover built
into it in order to protect your subwoofers.
• Connect the RCA1 Output 3 to the rear inputs of the
amplifi er.
• Connect the Amp Turn On wire from the dFO2 harness to
the remote turn on input of the amplifi er(s).
• Plug the Data cable into the RCA1 harness and the other
end into the Maestro AR.
STEP 3
• Connect all the harnesses to the Maestro AR module.
STEP 4
Program the OEM radio to “amplifi ed mode”.
• Close vehicle doors.
• Turn ignition ON-OFF-ON.
• Wait for radio to be completely booted.
• Set the audio source to OFF.
• Cycle the parking brake ON–OFF–ON.
• Push and hold Volume+ button on the steering wheel. The
radio screen will change to FM and will show volume 0.
Release the button. (You may also turn the volume knob
clockwise instead of using the Volume + button.)
• Screen will show Volume 10 – 20 - 30.
The Maestro AR is now locked to this particular vehicle by
VIN number.
Note: If you need to return the radio to its factory non-
amplifi ed mode, do this programming procedure and
press and hold VOL– button on the steering wheel instead.
The radio screen will change to FM and will show volume
0. Release the button. (You may also turn the volume knob
counter-clockwise instead of using the Volume - button.)
The radio screen will show Volume (30 – 20 - 0). The de-
programming sequence is complete.
The AR is now unlocked from the vehicle.
Note 2:
The aftermarket amplifi er will not turn OFF with the key, it
will shut down when the vehicle goes to sleep.
Chime adjustment
Front chime
Set Audio source to OFF. Activate front chime (Ex: door
chime). Adjust using the radio’s volume knob.
Rear chime
Set Audio source to OFF. Activate Rear chime (Ex: Rear
parking assist). Adjust using the radio’s volume knob
1