
Owner's Manual


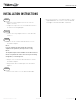
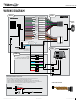
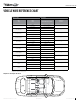
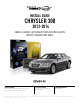
Table Of Contents
- Install Guide
- Scans of Packaging

ADS-AR-CHR02 maestro.idatalink.com
CHRYSLER 200 2015-2016
Automotive Data Solutions Inc. © 2017
4
INSTALLATION INSTRUCTIONS
STEP 1
• Remove the factory amplifi er (refer to wire chart for
amplifi er location).
• Confi gure the 2 pin connectors on the AR-CH2 T-harness
as shown on the wiring diagram.
STEP 2
• Connect the factory amplifi er harnesses to the AR-CH2
T-harness.
STEP 3
• Connect the wires from the AR-CH2 T-harness to the
aftermarket amplifi er.
Note 1:
If you are running your own speaker wires from the
amplifi er to the speakers, this step is not necessary.
Note 2:
The amplifi er output colors and labels on the CH2 T-harness
do not correspond to the vehicle. For vehicle specifi c wiring
designation, see the wiring chart.
• Plug the connector from the AR-CH2 T-Harness into the
aftermarket amplifi er.
• Plug the Data cable to the data port of the aftermarket
amplifi er.
STEP 4
• Connect all the harnesses to the Maestro AR module.
• For technical assistance call 1-866-427-2999 or e-mail
“support@idatalink.com”. Visit us at “maestro.idatalink.
com/support” and “www.12voltdata.com/forum/”
1