
Installation guide
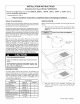

Attach vent pipe and elbow to Furnace vent outlet with at
least two field supplied corrosion resistant sheet metal
screws located 180 ° apart at each connection joint. (See
Figure 2) Maintain 3112" from center of vent pipe to side of
furnace. Do not continue to install remaining vent system
until the Vent Guard Top is installed.
Vent Pipe Installation
i I
25-24-24-1
Determine leng h of his sec ion to maintain
31/2" from center of vent pipe to side of furnace
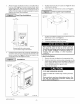
Position the Vent Guard on the casing side, aligning the top
and bottom holes in the Guard flange with the holes in the
furnace casing. (See Figure 3) Secure the Guard to the
casing with screws through these holes.
Installation
Vent Guard
Vent Guard
Bottom
25-24-57b
5. Position Vent Guard Top on Guard (See Figure 4). Bend
centering tabs equally.
6. Fasten Guard Top with three(3) screws (see Figure 4).
Vent Guard Top Installation
Vent Guard
25-24-59
7. Position Guard Bottom at bottom of vent guard and secure
with three(3) screws (see Figure 3).
8. Install furnace door on casing and check fit.
9. Complete installation of the vent system.
Before drilling additional holes in furnace casing or
vent guard, be aware of what is on the other side.
Screws tips may damage internal furnace components
or vent system resulting in electrical shocks or
shorting, flue gas leakage, or other hazardous
conditions.
Label Installation
1,
2.
Remove the paper backing from the appropriate label.
Orient the label in the correct position and apply over the
surface of the old label. Prevent air bubbles in the new la-
bel by applying the label at one corner and smooth the la-
bel out, working toward the opposit corner.
3. Repeat for other labels
CUTS AND ABRASION HAZARD
Failure to follow this caution may result in personal
injury.
Sheet metal parts may have sharp edges or burrs. Use
care and wear appropriate protective clothing and
gloves when handling parts.
441 06 1045 01 2