
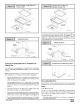
Installation guide
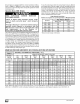
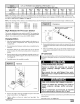


HEATING VALUE
at ALTITUDE
BTU/CU, FT.
2500
Orifice Size
LPG or PROPANE GAS MANIFOLD PRESSURE (" w.c.)
MEAN ELEVATION FEET ABOVE SEA LEVEL
0 to 2001 to 3001 to 4001 to 5001 to
2000 3000 4000 5000 6000
10.0 10.0 9.0 10.0 9.4
#54 #54 #54 #55 #55
6001 to 7001 to
7000 8000
8.5 10.0
#55 #56
NOTE: The derating of these furnaces at 2% (Natural Gas) and 4% (Propane Gas) has been tested and design-certified by CSA.
In Canada, the input rating must be derated 5% (Natural Gas) and 10% (Propane Gas) for altitudes of 2,000 to 4,500 above sea level. Use
the 2001 to 3000 column in Table 5 and Table 6.
NOTE: The derating of these furnaces at 2% (Natural Gas) and 4% (Propane Gas) has been tested and design-certified by CSA.
The burner orifice part nos. are as follows:
Orifice #41 1096942 Orifice #42 1011351
Orifice #43 1011377 Orifice #44 1011352
Orifice #45 1011353 Orifice #54 1011376
Orifice #55 1011354 Orifice #56 1011355
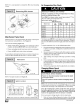
High Altitude Air Pressure Switch
The factory-installed pressure switch need NOT be changed for
any furnace installations from sea level up to and including 8,000'
altitude. See service parts for use above 8,000' altitude.
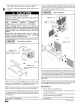
Changing Orifices
1. After disconnecting power and gas supply to the furnace, re-
move the burner compartment door, exposing the burner
compartment.
2. Disconnect gas line from gas control valve so manifold can be
removed.
3. Disconnect wiring at gas control valve. Be sure to note the
proper location of all electrical wiring before being discon-
nected.
4.
Remove the four (4) screws holding the manifold and gas con-
trol valve to the manifold supports. Do not discard any screws.
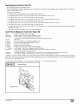
See Figure 21.
5. Carefully remove the manifold assembly.
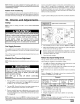
Clearances
Measure from face of orifice to the
( I back side of the manifold,
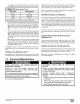
8. Reassemble all parts in reverse order as removed. Be sure to
engage the main burner orifices in the proper openings in the
burners.
9. After reassembling, turn gas on and check all joints for gas
leaks using a soapy solution. All leaks must be repaired imme-
diately.
LP Conversion
An accessory kit shall be used to convert to propane gas use, see
the furnace rating plate for the LP conversion accessory kit part
number.
6.
7.
441 01 231402
Manifold
O
25-25-15
Remove the orifices from the manifold and replace them with
proper sized orifices. See Figure 22.
Tighten orifices so they are seated and gas-tight. See
Figure 22.
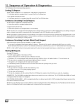
CARBON MONOXIDE HAZARD.
Failure to follow this warning can result in
death, property damage and/or personal
injury.
Nox inserts for use with Natural Gas units
ONLY. If LP Gas is required, NOx inserts must be
removed.
FIRE, EXPLOSION, UNIT DAMAGE HAZARD.
Failure to follow this warning can result in
death, property damage and/or personal
injury.
An LP conversion accessory kit is required
when operating the furnace with LP gas.
For LP conversion remove screws that secure the NOx insert and
discard insert.
Reinstall screws. See Figure 23