
User Manual
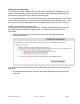
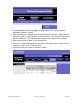
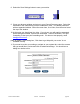
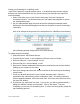
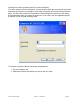
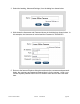
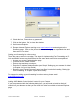
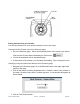
Table Of Contents

Version 2.2 March 2005 iControl Confidential page 24
Setting port forwarding for a NetGear router
Here are the steps for a typical NetGear router. Your NetGear router screens may be
different from those shown here and you should consult your NetGear user manual for
more information.
1 Select ‘Click here to go to your router’s home page’ from the ‘Camera Not
Accessible’ window. You will then need your user name and password to access
the administration page.
2 On your adminstration page, there will be an item called port forwarding under
Advanced in the left hand navigation bar that you will select to enter the necessary
information.
Here is an example of the portion of the setup screen for a NetGear router showing
port forwarding already configured for an iControl camera.
To implement port forwarding,
1 Select the button, Add Custom Service.
2 Create a Service name. In this example the Service name is Camera.
3 Enter the Start port. In this example, it is 80.
4 Enter an End port. In this example, it is 80.
5 Enter the IP address obtained by following the instructions in prior section entitled,
Setting up your camera for live video.
6 Save your changes and close the screen as shown on the router’s port forwarding
setup screen.
7 Close your browser and return to your iControl Summary page. Select the
thumbnail of the camera that you have enabled for video. You will be presented
with an expanded window. Select the menu item, Live Video, from the menu bar at
the top of the window.
8 At this point you should see live video. If you do not, you will be presented with a
dialog box entitled, Camera not Accessible. Click on the button, ‘Test port
forwarding’, to test your port forwarding work. If it does not test properly, repeat the
port forwarding process.