
User Manual


3
Initial Setup
The following steps will help you set up and integrate your mio2 as easily as possible.
1. Connect a Mac or PC to USB Device jack 2, using the supplied USB-A to USB-B cable.
mio2 is powered by the the far-right USB Device jack connection, marked “POWER IN.” If you
are using only one computer with the mio, always connect it to USB Device Jack 2.
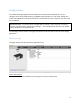
2. Download and install the included iConfig software to a Mac or PC from
www.iconnectivity.com/support/downloads. Launch the program.
iConfig will automatically check to ensure your interface has the latest firmware installed.
mio2 is shipped from the factory with a default configuration that includes MIDI routing and
merging between all the connected devices. You can operate the mio2 in this default
configuration, or use iConfig to customize the routing and MIDI management for your specific
needs. Custom settings can be saved on the interface for next use.
mio2 requires no driver software to operate on either Mac OS X or Windows.
3. Connect your MIDI devices and/or an additional Mac or PC to the interface. Your interface
can also operate stand-alone without a computer as long as you provide power on USB
Device Jack 2 using a USB charger source or powered hub.
For detailed information about hardware connections, please see the mio2 Hardware Layout
4. The mio2's MIDI routings are in the factory default state, which is a "one size fits all" setup
that you can reconfigure. Your Mac/PC DAW software automatically sees all the available 16-
channel MIDI port sources and destinations the mio2 provides, and connected MIDI devices
are routed to both computers and to each other.
For information about MIDI routing, both the factory default setup and how to customize it,
please see the MIDI Routing and Processing section.