
User's Guide


11
VI. INSTALLATION AND CONFIGURATION
The radar installation sequence is as follows:
1. Choose the installation site;
2. Mount the support;
3. Place the radar on its support;
4. Connect the PC to the radar;
5. Send the configuration parameters;
6. Check the accuracy of the data.
An incorrect installation can change the precision on the data. See p. 36 for more information about
the influence of the installation of the accuracy of the data.
The best results are obtained with the following conditions:
- measure on a single traffic lane in only one direction. Please remember that very heavy
rainfall (sudden shower or flurry, combined with gusts of wind during a storm for example)
can create false detections (parasitic measurements) in the receding direction (measurement
of vehicles moving away).
- mounting pole perpendicular to the road (a deviation in the post of 6 degrees can create a
speed measurement error of 5 %. The software allows the road gradient or slope to be
corrected for, see p. 16),
- measure outside braking, acceleration and congestion zones.
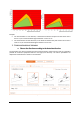
The green areas in the following diagrams indicate the best installation height and road distance
combinations. It is possible to operate outside the zones concerned, but the measurements will be
less accurate. This colour code also appears in the software during the selection of the installation
parameters. We show hereunder the graphs related respectively to versions 8.56 and 8.60 (TMS-
SA3B) and versions 8.80 and 8.90 (TMS-SA4). The versions 8.60 and 8.90 were released from
December 11, 2012.
Graph 1: vers. 8.56 & 8.80, one direction
Graph 2: vers. 8.56 & 8.80, both directions