
Installation Sheet


7
watchpoint
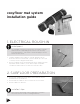
The installation must be performed in accordance with all
National and Local Building & Electrical Codes and any
local amendments. Turn o the electrical supply to avoid
risk of electric shock.
Perform electrical connections in accordance with the
thermostat installation guide provided.
9. FLOOR FINISH
11. ELECTRICAL CONNECTIONS
10. RESISTANCE TEST (after installation)
1. Cover floor and heatmat with thinset mortar or self-leveling
concrete compound in accordance with manufacturer’s
instructions.
2. Keep foot trac & general construction to a minimum until tile
flooring is installed.
3. Install new flooring using caution: don’t drop flooring material,
trowel, or scrape floor.
4. Ensure other personnel are aware of the in-floor heating system.
(mark wall at conduit location “no nails”, make sure plumbers don’t
need to drill any holes etc)
1. Using a digital OHM meter, measure the resistance between the
power leads. (insulated wires) This reading should be within 5%
of the OHM reading on the cable tag.
2. Using the digital OHM meter, measure the resistance between the
Ground (un-insulated) cable and each of the power (insulated)
leads. This should have no reading or .OL (open load). If
you have an OHM reading at this point STOP AND DO NOT
CONTINUE WITH INSTALLATION.
3. Measure OHM reading for thermostat floor sensor & ensure this
reading is within the guidelines stated on the floor sensor cable tag.
4. Record these readings along with heatmat serial number, date
and factory readings on the warranty application at www.icobath.
com/cosyfloor-warranty. Submit completed warranty form to
ICO for warranty registration.
installer’s tips
• DO NOT use a knife to clean grout lines.
• DO NOT have floor heat on during floor install.