Installation, Start-up and Maintenance Manual GEM-MFI Series 60 hz. Ice-O-Matic 11100 East 45th Ave Denver, Colorado 80239 Part Number 9081403-01 Rev.
GEM-MFI SERIES Introduction How To Use This Manual Ice-O-Matic provides this manual as an aid to the end user and service technician in installation and maintenance of the GEM-MFI Series ice machines. Do not attempt to perform installation, start-up or maintenance unless you have read and fully understand this manual. For a Service Provider, please reference our “Find a Service Technician” tab at www.iceomatic.com Keep this manual for future reference.
GEM-MFI SERIES Table Of Contents Table of Contents Introduction .................................................................................................................................. Warranty ...................................................................................................................................... Table Of Contents........................................................................................................................ Freight Claim Procedure .........
GEM-MFI SERIES Freight Claim Procedure Important! Inspect Promptly This merchandise has been carefully inspected and packed in accordance with the carrier’s packing specifications. Responsibility for safe delivery has been assumed by the carrier. If loss or damage occurs, you as the consignee must file a claim with the carrier and hold the container for carrier’s inspection.
GEM-MFI SERIES For the Installer Installation Guidelines: For proper operation of the Ice-O-Matic ice machine, the following installation guidelines must be followed. Failure to do so may result in loss of production capacity, premature part failures, and may void all warranties.
GEM-MFI SERIES For The Installer Air and Water Cooled Page 2
GEM-MFI SERIES For The Installer Remote Page 3
GEM-MFI SERIES For the Installer Bin Application The GEM-MFI Series is designed to fit the following Ice-O-Matic Bins ●B42, using Bin Top KBT 24 ●B25, B40 or B55 using Bin Top KBT 19. ●B100, using Bin Top KBT 23 (one unit) or KBT 22 (two units). ●B700-30, B1000-48, B1300-48, B1325-60 B1600-60 Dispenser Application The GEM Series can be placed on and used with certain ice and beverage dispensers. Kits are required for proper operation. The MFI Series is not approved for dispenser application.
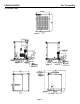
GEM-MFI SEREIS For the Installer Location: Ice-O-Matic ice machines are designed to be installed indoors in a controlled environment. Install the ice machine in a location where it has enough space around it to be accessible for service. A minimum of 6 inches must be allowed at the back for air circulation on air cooled models. Try to avoid hot, dirty and crowded locations. Be sure that the location of the machine is within the environmental limitations. Storage Bin: Remove the bin packaging.
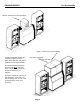
GEM-MFI SERIES For the Installer Allow 6 “Clearance for Air Circulation Allow 6 “Clearance for Air Circulation A proper installation locates the ice machine indoors, but in a place where the heat and noise it produces are not objectionable. Two Units on One Bin Air cooled machines discharge hot air out the back and must have a minimum of 6 inches of clearance behind the ice machine. Space for maintenance access is also important.
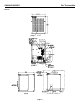
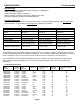
GEM-MFI SERIES GRC Dimensions (Inches) A B C D E F G H GEM/MFI Model Number Line Sets RT325404 RT340404 Remote Condenser GRC1001 33.36 10.75 23.81 2.04 6.12 16.73 11.65 19.57 GEM0650R 25 Foot Precharged Line Set 40 Foot Precharged Line Set Page 7 GRC1061 33.36 10.75 23.81 2.04 6.12 16.73 11.65 19.57 GEM0956R GRC1061 33.36 10.75 23.81 2.04 6.12 16.73 11.65 19.
GEM-MFI SERIES Remote Condenser Location Use the following for planning the placement of the remote condenser relative to the ice machine. Location Limits: Remote condenser location must not exceed ANY of the following: ● Maximum rise from the ice machine to the remote condenser is 35 physical feet. ● Maximum drop from the ice machine to the remote condenser is 15 physical feet. ● Physical line set maximum length is 100 feet. ● Calculated line set length maximum is 150 feet.
GEM-MFI SERIES For the Installer Remote Condenser Location: Limited to a 25 foot or a 40 foot length of precharged refrigerant tubing connecting the ice machine to the remote condenser. The remote condenser must be above or level with the ice machine. Select the best available location, protecting the remote condenser from extremes of dirt, dust and sun. Meet all applicable building codes. Usually the services of a licensed electrician are required. Roof Attachment: 1.
GEM-MFI SERIES For the Installer Typical Installation REMOTE CONDENSER ICE MACHINE Page 10
GEM-MFI SERIES For the Installer Coupling Instructions: Initial Connections: 1. Remove the protector caps and plugs. Wipe the seats and threaded surfaces with a clean cloth to be certain that no foreign matter remains on them. 2. Lubricate the inside of the couplings, especially the O-Rings with refrigerant oil. 3. Position the fittings on the correct connections on the remote condenser and ice machine.
GEM-MFI SERIES For the Plumber Water Inlet: ●Air Cooled Models: The recommended water supply is clean, cold water. Use 3/8 inch O.D. copper tubing, connect to the 3/8 inch FPT at the back of the cabinet. Install a hand valve near the machine to control the water supply. ●Water Cooled Models: A separate 3/8 inch O.D. copper line is recommended, with a separate hand valve to control it. Connect to the 3/8 inch FPT condenser inlet at the back of the cabinet.
GEM-MFI SERIES For the Plumber Water Inlet: ●Remote Cooled Models: The recommended water supply is cold water. Use 3/8 inch O.D. copper tubing, connect to the 3/8 FPT on the back of the cabinet. Install a hand valve near the machine to control the water supply. Drains: ●Remote Cooled Models: There is one 3/4 inch FPT drain at the back of the cabinet; the drain line is of the gravity type, and 1/4 inch per foot fall is an acceptable pitch for the drain tubing.
GEM-MFI SERIES For the Electrician Electrical Connections: Check the ice machine nameplate (located on the back panel) for the voltage requirements, and minimum circuit ampacity. The ice machine requires a solid chassis to earth ground. Connect the ice machine to its own electrical circuit so it is individually fused. Voltage variation must remain within the limitations, even under starting conditions. Note: All external wiring must conform to national, state and local electrical codes.
GEM-MFI SERIES For the Electrician INSTALLATION MUST CONFORM TO ALL APPLICABLE CODES. Connect the electrical power to the unit to the wires in the junction box at the rear of the machine. Check the nameplate (located on the back panel) for the voltage requirements, and for the minimum circuit ampacity. The machine requires a solid chassis to earth ground wire. Connect the ice machine to its own electrical circuit so it is individually fused.
GEM-MFI SERIES For the Installer Completed Installation-Remote Condenser A typical installation should generally appear as illustrated below. The best place for the remote condenser is above the ice machine, although other locations are permissible.
GEM-MFI SERIES For the Installer Final Check List: Air and Water Cooled _______1. Is the ice machine installed indoors in a location where the air and water temperatures are controlled and where they do not exceed the design limitations? _____2. Is there an electrical service disconnect within sight of the installed machine? _____3. Has the voltage been checked and compared to the nameplate requirements? _____4. Have all the plumbing connections been made and checked for leaks? _____5.
GEM-MFI SERIES For the Installer Final Check List: Remote ___1. Is the ice system installed indoors in a location where air and water temperatures are controlled, and where they do not exceed the design limitations? Condenser Leveled? ___2. Is there an electrical service within sight of the installed machine? Has the voltage been checked, and compared to nameplate requirements? ___3. Have all the plumbing connections been made and checked for leaks? Roof Holes Sealed? Remote condenser secured? ___4.
GEM-MFI SERIES Start Up Pre-Start Inspection: Air and Water Cooled 1. Remove the front and side service panels. 2. Check that any shipping blocks have been removed. 3. Inspect the interior of the ice machine for loose screws or wires. 4. Check that no refrigerant lines are rubbing each other. 5. Check that the fan blades turn freely (Air Cooled). 6. Check that the unit is installed correctly according to the final check list. Start Up: 1. Go through the pre-start inspection. 2.
GEM-MFI SERIES Start Up Pre-Start Inspection: Remote 1. Remove the front and side service panels. 2. Check that any shipping blocks have been removed. 3. Inspect the interior of the ice machine for loose screws or wires. 4. Check that no refrigerant lines are rubbing each other. 5. Check that the fan blades turn freely (Remote Condenser). 6. Check that the refrigerant lines are properly installed. 7. Check that the electrical power has been on for at least 4 hours and that the compressor dome is warm. 8.
GEM/MFI Series Cleaning/Sanitizing Procedures ICE Machine and/or Bin/Dispenser Cleaning and Sanitizing Instructions Cleaning should be scheduled at a minimum of twice per year. Sanitizing should be performed after each cleaning or more frequently as required. Note: Electrical power will be ON when performing the following cleaning instructions. The cleaning and sanitizing of any commercial ice machine are important procedures all operators need to have in their preventive maintenance protocol.
GEM/MFI Series Cleaning/Sanitizing Procedures Sanitizing Prior to Sanitizing the ice machine and/or Bin/Dispenser, perform the following: 1. Remove the ice machine front panel. 2. Turn the machine “OFF” at the ON/OFF selector switch. 3. Turn OFF the potable water supply to the ice machine. 4. Remove all ice in the storage bin. (Required for cleaning and/or sanitizing) Sanitizing Instructions-Ice Machine 1.
GEM-MFI SERIES Condenser Maintenance: Remote ● Clean the condenser: the condenser may appear to be clean on the surface, but it can still be clogged internally. Check with a flashlight from the front to see if light can be seen through the condenser fins. Brush in direction of fins The condenser coil must be kept clean. The condenser can be cleaned with compressed air or by using a brush. If a brush is used, brush in the direction of the fins taking care not to bend or distort the fins.
GEM-MFI SERIES Maintenance: Air Cooled Clean the air cooled condenser: Air flow on this model is from front to back, so the inside of the ice machine will have to be available to clean the air cooled condenser. Use a vacuum cleaner or coil cleaner if needed. DO NOT use a wire brush. ● Disconnect electrical power, and remove the air filter if applicable. The filter may be cleaned or replaced. ● Clean the condenser: the condenser may appear to be clean on the surface, but it can still be clogged internally.
GEM-MFI SERIES Service History What to Do Before Calling for Service: ●Check the water supply to the ice machine. The ice machine is designed to shut off if there is no water to it. Check the water filters if there are any. ●Check the power supply to the ice machine. Reset the breaker if it is tripped. ●If both water and power have been checked and are available, try switching the power OFF and then ON. After 2 minutes the machine should restart.