
Owner's Manual
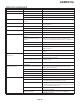
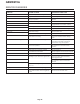
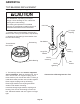
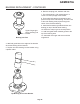
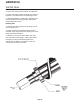
Table Of Contents
- Table of Contents
- SPECIFICATIONS Page 2
- CABINET DIAGRAMS Page 3
- GENERAL INFORMATION AND INSTALLATION Page 4
- ELECTRICAL CONNECTIONS Page 5
- WATER SUPPLY AND DRAIN CONNECTIONS Page 6
- FINAL CHECK LIST Page 7
- OPERATING INSTRUCTIONS Page 8
- INITIAL START UP CONTINUED Page 9
- SETTING THE DISPENSING SELECTOR Page 11
- PRINCIPLE OF OPERATION Page 12
- REFRIGERANT CIRCUIT Page 13
- MECHANICAL SYSTEM Page 14
- COMPONENT DESCRIPTION Page 15
- COMPONENT DESCRIPTION Page 16
- COMPONENT DESCRIPTION Page 17
- COMPONENT DESCRIPTION Page 18
- SERVICE DIAGNOSIS Page 19
- SERVICE DIAGNOSIS Page 20
- MAINTENANCE AND CLEANING INSTRUCTION Page 21
- CLEANING INSTRUCTIONS OF WATER SYSTEM Page 22
- REMOVAL AND REPLACEMENT Page 23
- TOP BEARING REPLACEMENT Page 24
- BEARING REPLACEMENT - CONTINUED Page 25
- WATER SEAL Page 26

BEARING REPLACEMENT - CONTINUED
4. Add food grade lube to the edges of the breaker
where the bearing will be inserted.
5. Tap the new roller bearing into the breaker using
a plastic mallet.
6. Remove coupling, bolt, washers and nuts.
7. The roller bearing is fully seated when it is
13/16” from the top edge of the breaker.
8. Thoroughly lubricate the thrust bearing and
place it on top of the roller bearing. The inner race
of the roller bearing must project through the
center of the flat thrust bearing.
9. Install the flat washer (provided with the new
bearing) on top of the flat thrust bearing.
10. Return the snap ring to its normal position.
11. Add food grade water resistant grease to the
top of the bearing area.
12. Assemble onto auger and secure with the
original bolt.
GEMD270A
Page 25
Tap Bearing & Tool into Breaker
Bearing and Tool
Tighten finger tight
before inserting into
breaker