
Owner's Manual
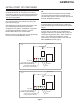
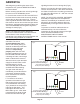
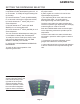
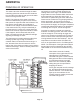

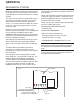
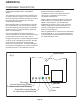
Table Of Contents
- Table of Contents
- SPECIFICATIONS Page 2
- CABINET DIAGRAMS Page 3
- GENERAL INFORMATION AND INSTALLATION Page 4
- ELECTRICAL CONNECTIONS Page 5
- WATER SUPPLY AND DRAIN CONNECTIONS Page 6
- FINAL CHECK LIST Page 7
- OPERATING INSTRUCTIONS Page 8
- INITIAL START UP CONTINUED Page 9
- SETTING THE DISPENSING SELECTOR Page 11
- PRINCIPLE OF OPERATION Page 12
- REFRIGERANT CIRCUIT Page 13
- MECHANICAL SYSTEM Page 14
- COMPONENT DESCRIPTION Page 15
- COMPONENT DESCRIPTION Page 16
- COMPONENT DESCRIPTION Page 17
- COMPONENT DESCRIPTION Page 18
- SERVICE DIAGNOSIS Page 19
- SERVICE DIAGNOSIS Page 20
- MAINTENANCE AND CLEANING INSTRUCTION Page 21
- CLEANING INSTRUCTIONS OF WATER SYSTEM Page 22
- REMOVAL AND REPLACEMENT Page 23
- TOP BEARING REPLACEMENT Page 24
- BEARING REPLACEMENT - CONTINUED Page 25
- WATER SEAL Page 26

SETTING THE DISPENSING SELECTOR
Setting the dispensing time
It’s possible to modify the dispensing time to 5, 10
or 15 seconds. To modify the original setting time
(5 seconds):
a) Push and hold the 4
th
switch (CONTINUOUS)
for 10 seconds until the first 3 lights start to blink,
b) Push & release the 1
st
switch (ICE) for a 5
second dispense.
c) Push & release the 2
nd
switch (ICE AND
WATER) for a 10 second dispense.
d) Push & release the 3
rd
switch (WATER) for a 15
second dispense.
The unit resumes a default dispense setting (Ice,
Ice and Water or Water) after each dispense.
To modify the resume mode (from factory set to
ICE) push the desired switch (ICE, ICE AND
WATER or WATER ) for 5 seconds.
H. CHECK OF THE DISPENSING OPERATING
MECHANISM
To check for the correct operation of the
dispensing mechanism:
a) First, select the Dispensing Mode by pushing
the proper switch.
b) Place a glass or a carafe in front of the two
Optical Dispensing Devices.
c) The dispensing drive motor and/or the water
solenoid valve starts. Ice and/or water is
discharged through the bottom plastic spout.
The drive motor and/or the water solenoid valve
remains in operation (per dispensing time settings)
unless the glass or carafe is removed.
Push the CONTINUOUS switch and check again
for the dispensing mechanism operation per the
steps above.
The drive motor and/or the water solenoid valve
will remain in operation until the glass or carafe is
removed.
I. If connected, remove the refrigerant service
gauges and re-attach the service panels.
J. Instruct the owner/user on the general operation
of the ice machine and its required cleaning and
care.
GEMD270A
Page 11
Note: If all the dispensing
selector lights are blinking, the
main control board (on the
right side of the unit) has
sensed a problem with the
machine's operation. Check
the main board's diagnostic
lights for further information.
r