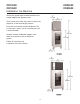
SERVICE/INSTALLATION MANUAL HOTEL/MOTEL DISPENSER GC Series Cuber Shown CD10022 CD10522 ICE Series Cuber Shown CD20030 CD20530 ICE-O-Matic 11100 East 45th Avenue Denver, Colorado, USA 80239 Part Number 80701101 Print Date: 6/00
CD10022 CD10522 Introduction CD20030 CD20530 To the owner or user. This product is a source of information about the installation, start up, cleaning, maintenance and repair of the product. The CD10022, CD10522, CD20030 and CD20530 are Ice-O-Matics brand hotel/motel ice dispenser. The CD10022 is designed to use a Ice-O-Matic model GC300, 550, ECP 400, 550, 556 ice machine as the source for ice. The CD-200-30 is designed to use a Ice-O-Matic model ICE 250, 400, 500 and 600 ice machine as the source of ice.
CD10022 CD10522 Specifications CD20030 CD20530 Limitations: • Must meet the same limitations as the cuber installed on top of it: o • 50 F air minimum o • 100 F air maximum • Must be installed indoors • Must allow space to the right for air intake when using air cooled machine. • The CD10022 and CD10522 are compatible only with Ice-O-Matics’ models GC 300, 550, ECP 400, 550, 556. • The CD20030 and CD20530 are compatible only with Ice-O-Matics’ models ICE 250, 305, 400, 500, 600.
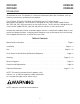
CD10022 CD10522 Installation: General CD20030 CD20530 After the carton has been removed from the dispenser, the legs may be installed. Place flat portions of the carton on the floor behind the dispenser and lay the dispenser down on its back. Thread the legs into the base of the dispenser. Be sure that the legs are screwed in all the way. Turn the leg levelers in all the way. Move the dispenser to an upright postion and set it in the location where it will be installed.
CD10022 CD10522 Installation: Ice Machine CD20030 CD20530 Check that gasket tape has been placed at the outside edge of the dispenser top. Place corner posts from the carton on top of the dispenser, at the left and right corners. Place the ice machine onto the dispenser. The ice machine is heavy, use of a mechanical hoist is recommended. Carefully remove cardboard supports and allow ice machine to rest on dispenser gasket. Follow all instructions for installation of the ice machine.
CD10022 CD10522 Kits: Coin Mechanism CD20030 CD20530 Kits are available to install a coin mechanism, a room key mechanism or a key card mechanism. All kits come with detailed instructions which are also listed below. 8. Mount the timer and relay from the kit in the control box. (See typical layout of the parts in the following page). Please follow these instructions carefully to complete the addition of the coin mechanism kit to the CD10022, CD10522, CD20030, and CD20530 ice dispenser. 9.
CD10022 CD10522 Kits: Coin Mechanism CD20030 CD20530 15. Replace the control box cover, front brace and decorative front cover. The dispenser should now be restored to service.
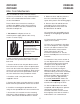
CD10022 CD10522 Key Kit Installation This kit has been designed for use with the CD10022, CD10522, CD20030 and CD20530 ice dispenser. When this kit is installed, ice cannot be dispensed unless a specific type of key is inserted into the lock cylinder. The kit contains a universal mounting fitting for lock cylinders and a switching mechanism. NOTE: The user must supply their own lock cylinders. Electrical shock hazard. Electrical shock can cause personal injury.
CD10022 CD10522 Key Kit Installation CD20030 CD20530 The operation of this kit is as follows: When the key is inserted into the lock cylinder, a portion of the key will extend beyond the brass fitting. It is this part of the key that will actuate the kit micro switch. Then when the dispense button swithch is depressed and held; the machine will dispense ice.
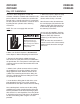
CD10022 CD10522 Key Card Kit Installation CD20030 CD20530 This kit has been designed for use with the CD10022, CD10522, CD20030 and CD20530 ice dispenser. When this kit is installed, ice cannot be dispensed unless a key card is inserted into the key card slot. The kit contains a universal mounting and a microswitch assembly. Electrical shock hazard. Electrical shock can cause personal injury. Disconnect power before begining to service components. 1.
CD10022 CD10522 Key Card Kit Installation CD20030 CD20530 The Operation of this kit is as follows: When the key card is inserted into the key card slot, and the dispenser button switch is depressed and held, the machine will dispense ice..
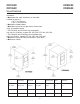
CD10022 CD10522 Final Check List/Initial Start Up CD20030 CD20530 Electrical Sequence: 1. Check that electrical power has been supplied. 2. Check that a drain, separate from the ice machine, insulated and made of rigid tubing, has been connected to the dispenser. Pushing the dispenser switch closes the contacts to the gearmotor and to the ice door solenoid.
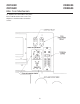
CD10022 CD10522 Operational Schematic CD20030 CD20530 12
CD10022 CD10522 Cleaning CD20030 CD20530 General Care and Ceaning: Periodically inspect and clean the ice dispenser to keep it operating at peak performance. sweep arm securing the wheel to the drive shaft. Remove the sweep arm by rotating it in the counter clockwise direction. Wash the outside of the dispenser with warm water and soap. Rinse off and dry. 6. Pull the wheel off the drive shaft and leave it in the dispenser. Cleaning and Sanitizing of the Ice Storage Bin: 7.
CD10022 CD10522 Cleaning CD20030 CD20530 10. Mix a solution of ice machine sanitixer and water: 1 ounce of household bleach to 2 gallons of (95o F-115o F) water. Wash all interior surfaces and the wheel withthe sanitizer solution. Use a clean cloth. 11. Allow the parts to air dry. 12.Reassemble wheel and sweep arm onto drive shaft. 13. Replace all panels. 14. Reconnect power, be sure ice machine is switched back on.
CD10022 CD10522 Service Diagnosis PROBLEM Does not vend CD20030 CD20530 POSSIBLE CAUSE No ice No power Vend switch open Check power supply Check / replace vend switch Sink interlock switch open Check / replace sink interlock switch Machine is not level Ice jams in chute Front panel not on all the way Gear motor open Relay does not operate Ice door does not open Leaks water Reinstall panel Check/replace gearmotor Check wiring Check power to relay Check for burnt contacts Check for power to solenoid
CD10022 CD10522 Removal and Replacement CD20030 CD20530 Dispense Wheel: 1. Remove all of the ice stored inside the dispenser bin and shut off the ice maker. Electrical shock hazard. Electrical shock can cause personal injury. Disconnect power before begining to service components. 2. Disconnect the electrical power. 3. Remove ice machine from dispenser. 4. Remove large dispenser top panel. 5. Reach into opening, locate the sweep arm which secures the wheel to the drive shaft. Remove the sweep arm.
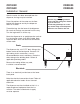
CD10022 CD20030 CD10522 CD20530 Standard With Room Key Kit or Card Kit Electrical Schematic 17
CD10022 CD20030 CD10522 CD20530 Standard With Room Key Kit or Card Kit Electrical Schematic 18
CD10022 CD10522 With Coin Mechanism Electrical Schematic 19 CD20030 CD20530
SERVICE HISTORY MODEL NUMBER: ______________ SERIAL NUMBER: _____________ ____________________________ ____________________________ ____________________________ ____________________________ ____________________________ ____________________________ ____________________________ ____________________________ ____________________________ ____________________________ ____________________________ 11100 East 45th Avenue • Denver, Colorado, USA 80239 • Telephone: (303) 371-3737 • Facsimile: (303) 371-6296