
User Manual

20
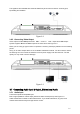
z 3 ways relay alarm output (NO contact). Provide external power to external alarm device.
z To avoid overloading, please read the following relay parameters sheet carefully.
z RS485 A/B cable is for the A/B cable of the PTZ decoder.
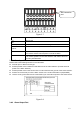
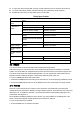
Relay Specification
Model:
JRC-27F
Material of the
touch
Silver
Rated switch capacity 30VDC 2A, 125VAC 1A
Maximum switch power 125VA 160W
Maximum switch voltage 250VAC, 220VDC
Rating
(Resistance
Load)
Maximum switch currency 1A
Between touches with same
polarity
1000VAC 1minute
Between touches with different
polarity
1000VAC 1minute
Insulation
Between touch and winding 1000VAC 1minute
Surge voltage
Between touches with same
polarity
1500V (10×160us)
Length of open
time
3ms max
Length of close
time
3ms max
Mechanical 50×106 times (3Hz)
Longevity
Electrical 200×103 times (0.5Hz)
Temperature
-40℃ ~+70℃
3.9 RS232
You can connect the combo DVR with POS or Keyboard through RS232.
With POS system, the combo DVR can communicate through RS232 and network. For the POS
system, the combo DVR can integrate the text content and even search the record through the info.
The series combo DVR also supports NKB operation. You can operate the combo DVR from the
keyboard controls instead of using the control pad on the front panel of the unit.
To connect a NKB keyboard to the combo DVR:
1. Assemble the KBD keyboard according to the instructions in its accompanying installation manual.
2. Connect the KBD keyboard into one of the RS232 ports on the combo DVR or through network.
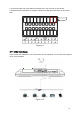
3.10 RS485
When the combo DVR receives a camera control command, it transmits that command up the
coaxial cable to the PTZ device. RS485 is a single-direction protocol; the PTZ device can’t return any
data to the unit. To enable the operation, connect the PTZ device to the RS485 (A,B) input on the
combo DVR. See
X289H289H289HFigure 3-9.
Since RS485 is disabled by default for each camera, you must enable the PTZ settings first. This
series combo DVR supports multiple protocols such as Pelco-D, Pelco-P.
To connect PTZ devices to the DVR:
1. Connect RS485 A,B on the DVR rear panel.