WB-T Transparent Water Bath Please read the User Manual carefully before use, and follow all operating and safety instructions! user manual english
User manual WB-T Transparent Water Bath Preface Thank you for purchasing our Heating Mantle. Users should read this manual carefully, follow the instructions and procedures, and beware of all the preventive measures when using this instrument. Service If help is needed, you can always contact your dealer or Labbox via www.labbox.
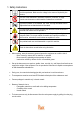
1. Safety Instructions Connect the device to an earthed socket to ensure the safety of the machine and the experiment. Make sure the voltage is the same as required by the device. The use of this instrument in flammable, explosive, poisonous, or highly corrosive environments or with hazardous substances is forbidden. Place the incubator on a horizontal, flat, clean, non-slip and stable surface. Adjust the feet so that the device is leveled.
Check the instrument and accessories before handling for damage prior to every use. Do not use damaged components. Safe operation is only guaranteed with the accessories described in the “Accessories” chapter. Accessories must be securely attached to the device and cannot come off by themselves. Always disconnect the plug before the assembly or disassembly of accessories. The voltage stated on the label must correspond to the main power supply.
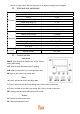
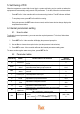
- If sent in for repair, clean, disinfect and pack it in its original packaging before shipping. 2.4. Main technical parameters 200-240 /100-120 800 Pt100 ±0.5 0~100 ≤±1 Voltage (V) Power (W) Sensor Function Structure Working conditions Temperature Motion (℃) Temperature Range (℃) Temperature Sensitivity (℃) Time Range Measurement error Shelves Height (mm) Shelves Holes Diameter Inner Chamber Size (L*W*H) Exterior Size (L*W*H) Packing Size (L*W*H) N.W. (KG) G.W. (KG) 0~9999 min or hours < 0.
3. Operation 1. Place the water bath on a stable surface that can support the weight of the device and leave 30 cm clear on each side. 2. Fill the tank to 2/3 of the total volume. 3. Connect to a power supply that is consistent with the voltage requirement of this instrument. Make sure it is properly earthed. 4. Switch the device on. The power supply indicator will light up. 5. Set the desired temperature (see instructions below).
5. Self-tuning of PID When the temperature control effect is not ideal, a system self-tuning can be carried out where the equipment will automatically configurate its PID parameters. To do that, follow the next instructions: - Press AT for 6s the controller will run the auto-tuning function. The AT indicator will flash. - To stop the process, press AT for 6s while it is running. - During the process, the SET button does not work, and the lower window always displays the temperature set value. 6.
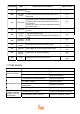
(RANGE) DEFAULT VALUE INDICATOR NAME Lc Password key ndA Temp alarm mode ndt Timer mode Hn Timer unit EH Timer end mode oPn Auxiliary parameter nP Maximum power Percentage of maximum power heating output. Co Off point If SV > (SP + Co), stop the heating output forcibly. SPL Minimum set point Adjustment of the minimum temperature. (0~0) 0 SPH Maximum set point Adjustment of the maximum temperature. (0~400.0) 300.
8.
www.labbox.