IBM ThinkVisionTM Monitor L200p L200p User's Guide English
First Edition (April/2004) Note: For important information, refer to the Monitor Safety and Warranty manual that comes with this monitor.
Safety (Read first).......................................................................................................2 Setting up the monitor ...............................................................................................5 Product description ..............................................................................................5 Handling instructions............................................................................................5 Kensington security slot ............
2
ENGLISH Always observe the following precautions to reduce the risk of injury and property damage. Do not attempt to service a product yourself unless instructed to do so by the IBM Support Center. Use only an IBM authorized service provider who is approved to repair your particular product. Note: Some parts can be upgraded or replaced by the customer. These parts are referred to as Customer Replaceable Units, or CRUs.
Be sure that the power outlet you are using is properly wired, easily accessible, and located close to the equipment. Do not fully extend power cords in a way that will stress the cords. Connect and disconnect the equipment from the electrical outlet carefully. All IBM personal computers contain a non-rechargeable coin cell battery to provide power to the system clock.
ENGLISH Setting up the monitor Product description The IBM ThinkVision Monitor, L200p, is a TFT LCD Color Monitor. It requires a computer with a suitable on-board sub-system or Video Adapter card that can support UXGA 1600 X 1200, SXGA 1280 x 1024, XGA 1024 x 768, SVGA 800 x 600, or VGA 640 x 480 at 60Hz.
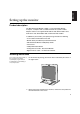
3. Before adjusting your monitor for the first time, remove the locking clip on rear of the stand. Carefully hold the screen of the monitor and squeeze the locking clip to remove. This action is shown in figure below. Kensington security slot This slot can be used to connect to a locking cable. Locking cables can be purchased separately at most computer stores.
ENGLISH Workplace preparation i This section gives advice on what you should consider before you set up your monitor. Height Position the monitor so that the top of the screen is slightly below your eye level when you sit at your workstation. Orientation 1. Choose a position that gives the least reflection from lights and windows, usually at a right angle to any windows. 2. Position the monitor directly in front of you so that you do not have to twist your body to see it. 3.
Working practices i This section gives advice on how you can work comfortably and reduce fatigue. Rest Take regular breaks. Vary your posture, stand up and stretch occasionally as prolonged use of computer workstations can be tiring. Back Sit back in your chair and use the backrest. Hands Adjust the seat height so that your forearms are approximately horizontal and your wrists are straight when using the keyboard. Your upper arms should be relaxed with your elbows near your body.
ENGLISH Connecting your monitor Be sure to read the Safety Information located in the Monitor Safety and Warranty Information Manual before carrying out this procedure. 1. Turn off your computer and all attached devices. Next, unplug all power cords to your computer and all attached devices. 2. Connect the signal cable. • The analog signal cable is already connected to your monitor. See in Figure A.
3. Connect the power cord to the monitor and then plug the power cord into a properly grounded outlet. Next, reconnect the power cords to your computer and all attached devices. Switching on your monitor 1. Switch on your computer. 2. Switch on the monitor power source by pushing the power switch A on side rear panel of the monitor. See Figure B on page 9. 3. Switch on your monitor by pushing and releasing the power switch marked " at the front of the bezel.
ENGLISH Device driver installation Installing the device driver in Windows 95 or Windows 98 This section must be completed before continuing with the Windows 95 or Windows 98 Image setup on page 14. i On LCD monitors, unlike CRTs, a faster refresh rate does not improve display quality. For optimal performance, use either 1600 x 1200 at a refresh rate of 60Hz or 640 x 480 at a refresh rate of 60Hz.
Installing the device driver in Windows 2000 or Windows Me This section must be completed before continuing with the Windows 2000, Windows Me Image setup on page 14. i On LCD monitors, unlike CRTs, a faster refresh rate does not improve display quality. For optimal performance, use either 1600 x 1200 at a refresh rate of 60Hz or 640 x 480 at a refresh rate of 60Hz.
ENGLISH Installing the device driver in Windows XP This section must be completed before continuing with the Windows XP Image setup on page 14. i On LCD monitors, unlike CRTs, a faster refresh rate does not improve display quality. For optimal performance, use either 1600 x 1200 at a refresh rate of 60Hz or 640 x 480 at a refresh rate of 60Hz.
Automatic Image setup Image setup Before carrying out this section, it is very important that the correct monitor drivers have been installed. (See pages 11 and 13. ) i The Setup Utility included on the setup CD displays a test pattern of dots. It does not replace or modify the display drivers. i The Image setup instructions require the monitor to be warmed up for 15 minutes. This is not required for normal operation.
ENGLISH Image setup for DOS i If the monitor is in standby mode, it may automatically turn off while you are waiting for it to warm up. If this happens, switch off the monitor and switch it on again after a few seconds. i If you are using PC-DOS/V, change to U.S. mode by typing CHEV US and pressing enter at the command prompt. i The size and diversity of the dot pattern varies with the screen resolution.
Image setup for Windows 95, Windows 98, Windows NT, Windows 2000, Windows Me, or Windows XP i If the monitor is in standby mode, it may automatically turn off while you are waiting for it to warm up. To set up the monitor automatically in Windows 95, Windows 98, Windows NT, Windows 2000, Windows Me, or Windows XP, do the following: 1. Turn on the monitor first; then turn on the computer. 2. 3. i The size and diversity of the dot pattern varies with the screen resolution. 4. 5.
ENGLISH Manual Image setup i If the monitor is in standby mode, it might automatically turn off while you are waiting for it to warm up. Normally, you can complete the setup procedure using Automatic Image setup; however, if your screen image is still distorted after you perform Image setup or the setup CD does not run on your system, perform Manual Image setup. To manually adjust the image setting, do the following: 1. Turn on the monitor and wait approximately 15 minutes for it to warm up. 2.
Adjusting your LCD monitor User controls i The image is already optimized for many display modes, however the user controls can be used to adjust the image to your liking. i The settings are saved after adjustment and when exiting the OSD and will be effective thereafter. USER CONTROL FEATURES Icon Monitor controls Switches the monitors on and off. Display main OSD menu and selects highlighted menu item. and Moves the cursor to highlight icons or make adjustments. Exits from current OSD menu.
ENGLISH On-screen display (OSD) controls i The LCD monitor needs time to become thermally stable the first time you turn it on each day. Thus, to achieve more accurate adjustments for parameters, allow the LCD monitor to warm up for at least 15 minutes before making any screen adjustment. The settings adjustable with the user controls are viewed through the On Screen Display (OSD). Press the enter button " " to display the main OSD menu.
OSD Icon Description Sub-menu(s) Control and adjustments Analog The Image setup function is used to adjust the level of noise in the video signal, which causes horizontal lines Image Setup Automatic or areas on the screen where the image appears to be unstable and jitter or shimmer. This can be adjusted automatically or manually. If manual is selected, the user will go to the manual adjustment screen. If Auto is selected, Control Locked the image will automatically adjust.
ENGLISH OSD Icon Description Sub-menu(s) Control and adjustments Analog Image Properties Input Signal Use this button to make the analog or digital connector active. This feature is used when two computers are connected to the monitor. The default setting is analog. Digital Analog Analog Digital Displays the detailed information of mode, model name and microcode. Options Information Menu Language The language chosen affects only the language of the OSD.
Further information Display modes i If your computer has previously been used with a CRT monitor and is currently configured to a display mode outside the range that the Flat Panel monitor can display, you may need to re-attach the CRT monitor temporarily until you have reconfigured the computer, preferably to 1600 x 1200 at 60Hz. The display mode the monitor uses is controlled by the computer. Therefore, you should refer to your computer documentation for details on how to change display modes.
ENGLISH Power management To benefit from power management, the monitor must be used in conjunction with a computer that implements the Video Electronics Standards Association (VESA) Display Power Management Signaling (DPMS) Standard. The power management feature is invoked when the computer recognizes that you have not used your mouse or keyboard for a user-definable period. There are several states as described in the table below.
Troubleshooting If you have a problem setting up or using your monitor, you may be able to solve it yourself. Before calling your retailer or IBM, try the suggested actions that are appropriate to your problem. Problem 24 Possible cause Suggested action Reference Screen is blank and power indicator is off. No power to monitor. • Ensure that the electrical outlet and the monitor are both switched on. • Check that the power cord is firmly plugged into the electrical outlet and the power supply unit.
ENGLISH Problem Screen is blank and power indicator is flashing green every 0.5 seconds Possible cause Display mode of • Reconfigure key on the the computer is computer to use a supported outside the display mode. range of the monitor "Check Signal The monitor is Cable" message not receiving a is shown and video signal power indicator is steady amber. i For image problems, you may want to run Image setup again before referring to this section. In most cases, Image setup can fix the problems.
Help and service information If you are unable to correct the problem yourself, you may seek further help as follows: Call the IBM Service and Support. In the U.S.A and Puerto Rico call 1-800-426-7378 In Canada (Toronto only) call 416-383-3344 In Canada (all other) call 1-800-565-3344 i If possible, stay by your computer. Your Technical Support Representative may wish to go through the problem with you during the call.
ENGLISH Specifications i Power consumption figures are for the monitor and the power supply combined. This color monitor (Type-model 6736-HC9) uses a 20.1-inch TFT LCD. With Stand W H ThinkVisio n D Height: Lowest Position 391.7 mm (15.42 in.) Height: Highest Position 471.7 mm (18.57 in.) Width: 467.5 mm (18.41 in.) Depth: 259.0 mm (10.2 in.) Weight With Stand: 9.3 kg (20.50 lbs) Image Viewable Image Size: Maximum Height: Maximum Width: Pixel Pitch: 20.1 inch (510.54 mm) 306 mm (12.
Service information The following parts are for use by IBM service, or IBM authorized dealers, to support the customer warranty. Parts are for service use only.
ENGLISH Notices and trademarks This section contains information on notices and trademarks. Notices IBM may not offer the products, services, or feature discussed in this document in all countries. Consult your local IBM representative for information on the products and services currently available in your area. Any reference to an IBM product, program, or service is not intended to state or imply that only that IBM product, program, or service may be used.
Trademarks The following terms, used in this publication, are trademarks or service marks of the IBM Corporation in the United States, other countries, or both; IBM IBM logo ThinkPad ThinkVision ENERGY STAR and the ENERGY STAR logo are U.S Govt. registered trademarks. Microsoft, Windows, and Windows NT are trademarks of Microsoft Corporation in the United States, other countries, of both. Other company, product, and service names may be trademarks or service marks of other.