ThinkPad 600 UltraslimBay HDD Adapter User's Guide OPTIONS by
First Edition (July 1998) The following paragraph does not apply to the United Kingdom or any country where such provisions are inconsistent with local law: INTERNATIONAL BUSINESS MACHINES CORPORATION PROVIDES THIS PUBLICATION “AS IS” WITHOUT ANY WARRANTY OF ANY KIND, EITHER EXPRESS OR IMPLIED, INCLUDING, BUT NOT LIMITED TO, THE LIMITED WARRANTIES OF MERCHANTABILITY OR FITNESS FOR A PARTICULAR PURPOSE.
Contents Part 1. Using the ThinkPad 600 UltraslimBay HDD Adapter Putting the HDD into the HDD Adapter . . . . . . . . . . . . Inserting the HDD Adapter into the UltraslimBay . . . . . . . Updating the System Program . . . . . . . . . . . . . . . . . Part 2. Appendixes . . . . . . . . . . . . . . . . . . . . . . . . . . . . . . . . . . . . . . . . . . . . . . . . . . . . . . . . . 2-1 Appendix A. Help and Service Information Step 1. Problem Solving . . . . . . . . . . Step 2. Preparing for the Call . . .
iv
Part 1. Using the ThinkPad 600 UltraslimBay HDD Adapter The ThinkPad 600 UltraslimBay HDD Adapter (hereafter called HDD Adapter) supports the ThinkPad 600 series computer. You can upgrade the capacity of your computer by installing a secondary hard disk drive. To install the hard disk drive (hereafter called HDD) into your computer, you must first assemble the HDD with the HDD Adapter. Then you insert the HDD Adapter into the UltraslimBay.
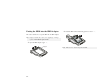
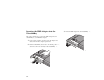
Putting the HDD into the HDD Adapter 2 This section describes how to put the HDD into the HDD Adapter. Install the HDD with the label facing upward as shown 2 . 2 Note: Replace a hard disk drive only if you are upgrading it or having it repaired. You should not replace it often. 1 Open the HDD Adapter stopper 1 . 1 1-2 stopper Note: Make sure not to leave the strap under the HDD.
3 Connect the HDD to the HDD Adapter connecter 3 . 4 Close the HDD Adapter stopper 4 . 4 3 Notes: 1. Make sure that the HDD is installed tightly in the HDD Adapter. 2. Do not push the cover too hard; otherwise, the HDD or HDD Adapter might become damaged. Part 1.
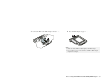
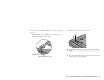
Inserting the HDD Adapter into the UltraslimBay 3 Insert the HDD Adapter into the UltraslimBay 2 . This section describes how to insert the HDD Adapter into the UltraslimBay of your ThinkPad computer. 1 Power off the computer, and remove the AC Adapter and cables; then turn the computer upside down. 2 Push the UltraslimBay device lock to the unlock position 1 , and remove the device currently in the UltraslimBay 2 .
If you want to secure your HDD Adapter, do as follows; otherwise, go to step 4. b. Install a hex-head screw into the screw hole 3 . a. Prick the security screw cap with the tip of a ball-point pen 1 , and then use the hole to remove the cap. 3 1 Note: Security screw cap UltraslimBay device lock 4 To tighten the security screw (or to remove it), use a 2.5-mm Allen wrench. Turn the computer right side up. Connect the AC Adapter and cables; then power on the computer. Part 1.
Updating the System Program If you are using one of the following ThinkPad 600 computer models, you need to update the system program: ThinkPad 600 2645-21x, 31x, 35x, 41x, or 51x x can be any number. Update the system program as follows: 1 Verify the following: Your computer is powered off. Your computer is undocked. The battery in your computer is fully charged. Your computer is connected to the AC Adapter. 2 Insert the system program diskette into the diskette drive. 3 Power on the computer.
Part 2. Appendixes Appendix A. Help and Service Information If you have questions about your new Options by IBM product, or if you require technical assistance, visit the IBM Personal Computing Web site at http://www.ibm.com/thinkpad for information about IBM, Options by IBM, or IBM Service and Support.
previous installation. Many IBM options include uninstallation programs. 4. Check all cabling to be sure that it is correct as shown in this manual. When you connect a cable to a cable connector, pay close attention to the colored stripes along the edge of the cable, and ensure that they are matched with PIN 1, on both the computer connector and the option connector. 5. If your option contains jumpers or switches, be sure their positions and orientation match the instructions in this manual. Step 2.
Appendix B. Product Warranty The following warranty information applies to products purchased in the United States, Canada, and Puerto Rico. For warranty terms and conditions for products purchased in other countries, see the enclosed warranty insert, or contact your IBM reseller or IBM marketing representative.
Warranty Service Extent of Warranty To obtain warranty service for the Machine, you should contact your reseller or call IBM. In the United States, call IBM at 1-800-772-2227. In Canada, call IBM at 1-800-565-3344. You may be required to present proof of purchase. IBM does not warrant uninterrupted or error-free operation of a Machine.
2. the amount of any other actual direct damages or loss, up to the greater of U.S. $100,000 or the charges (if recurring, 12 months' charges apply) for the Machine that is the subject of the claim. UNDER NO CIRCUMSTANCES IS IBM LIABLE FOR ANY OF THE FOLLOWING: 1. THIRD-PARTY CLAIMS AGAINST YOU FOR LOSSES OR DAMAGES (OTHER THAN THOSE UNDER THE FIRST ITEM LISTED ABOVE); 2. LOSS OF, OR DAMAGE TO, YOUR RECORDS OR DATA; OR 3.
Appendix C. Notices References in this publication to IBM products, programs, or services do not imply that IBM intends to make these available in all countries in which IBM operates. Any reference to an IBM product, program, or service is not intended to state or imply that only that IBM product, program, or service may be used.
IBM Part Number: 05K8522 Approval Draft Printed in the United States of America 5K8522