
Personal Computer User Manual
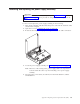
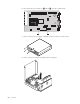
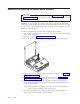
Table Of Contents
- Contents
- Important safety information
- Chapter 1. Overview
- Chapter 2. Installing options
- Handling static-sensitive devices
- Installing external options
- Opening the cover
- Locating components
- Accessing system board components and drives
- Identifying parts on the system board
- Installing memory
- Installing PCI adapters
- Installing internal drives
- Installing security features
- Erasing a lost or forgotten password (clearing CMOS)
- Closing the cover and connecting the cables
- Chapter 3. Using the IBM Setup Utility
- Appendix A. Replacing customer replaceable units (CRU)
- CRU list
- Removing and replacing the power supply assembly
- Removing and replacing the system board assembly
- Removing the microprocessor
- Replacing the microprocessor
- Removing and replacing the battery
- Removing and replacing the speaker
- Removing and replacing the power button and LED assembly
- Removing and replacing the fan assembly
- Completing the installation
- Appendix B. Updating POST/BIOS
- Appendix C. Cleaning the mouse
- Appendix D. Manual modem commands
- Appendix E. Notices
- Index
9.
Install
the
new
power
supply
assembly
into
the
chassis
so
that
the
screw
holes
in
the
power
supply
assembly
align
with
those
in
the
chassis.
Note:
Use
only
the
screws
provided
by
IBM.
10.
Install
and
tighten
the
four
power
supply
assembly
screws
into
the
rear
of
the
chassis.
11.
Reconnect
power
supply
connectors
P1
and
P2
to
the
system
board.
12.
Reconnect
power
supply
connectors
P3
and
P4
to
the
hard
disk
drive
and
CD-ROM
drive,
as
required.
13.
Correctly
route
all
power
supply
cables
to
avoid
interference
with
the
drive
bay
assembly.
14.
Go
to
“Completing
the
installation”
on
page
46.
Appendix
A.
Replacing
customer
replaceable
units
(CRU)
35